CIPA compliance template
The CIPA template helps protect your business from litigation under the California Invasion of Privacy Act (CIPA) and the Video Privacy Protection Act (VPPA). It does this by requiring California visitors to give consent before any tracking scripts run — a stricter standard than the standard CCPA opt-out model.
This article shows you how to enable and configure it.
Why does this matter?
Unlike CCPA, CIPA may require prior consent — not just an opt-out link — before technologies like session replay tools, chatbots, or ad pixels run.
What the CIPA template configures
Activating the CIPA template automatically sets up the following for your Usercentrics banner:
| Setting | What it does |
|---|---|
| California opt-in model | Visitors with a California IP address see an opt-in banner (like GDPR) instead of the standard CCPA opt-out link. Consent is required before any tracking begins. |
| Prior consent enforcement | No tracking scripts fire until the visitor actively interacts with the banner. This directly addresses the CIPA "Pen Register" argument. |
| Geo-targeting | The stricter opt-in rules apply only to California IP addresses. Visitors from other US states continue to see your standard opt-out banner. |
Opt-out requests processed through your banner only cover personal data processed through your CMP domains. You remain responsible for handling opt-out requests for any personal user data your company holds outside of your CMP.
Set up the CIPA template
To set up the CIPA template, follow these steps:
-
Log in to your Usercentrics account.
-
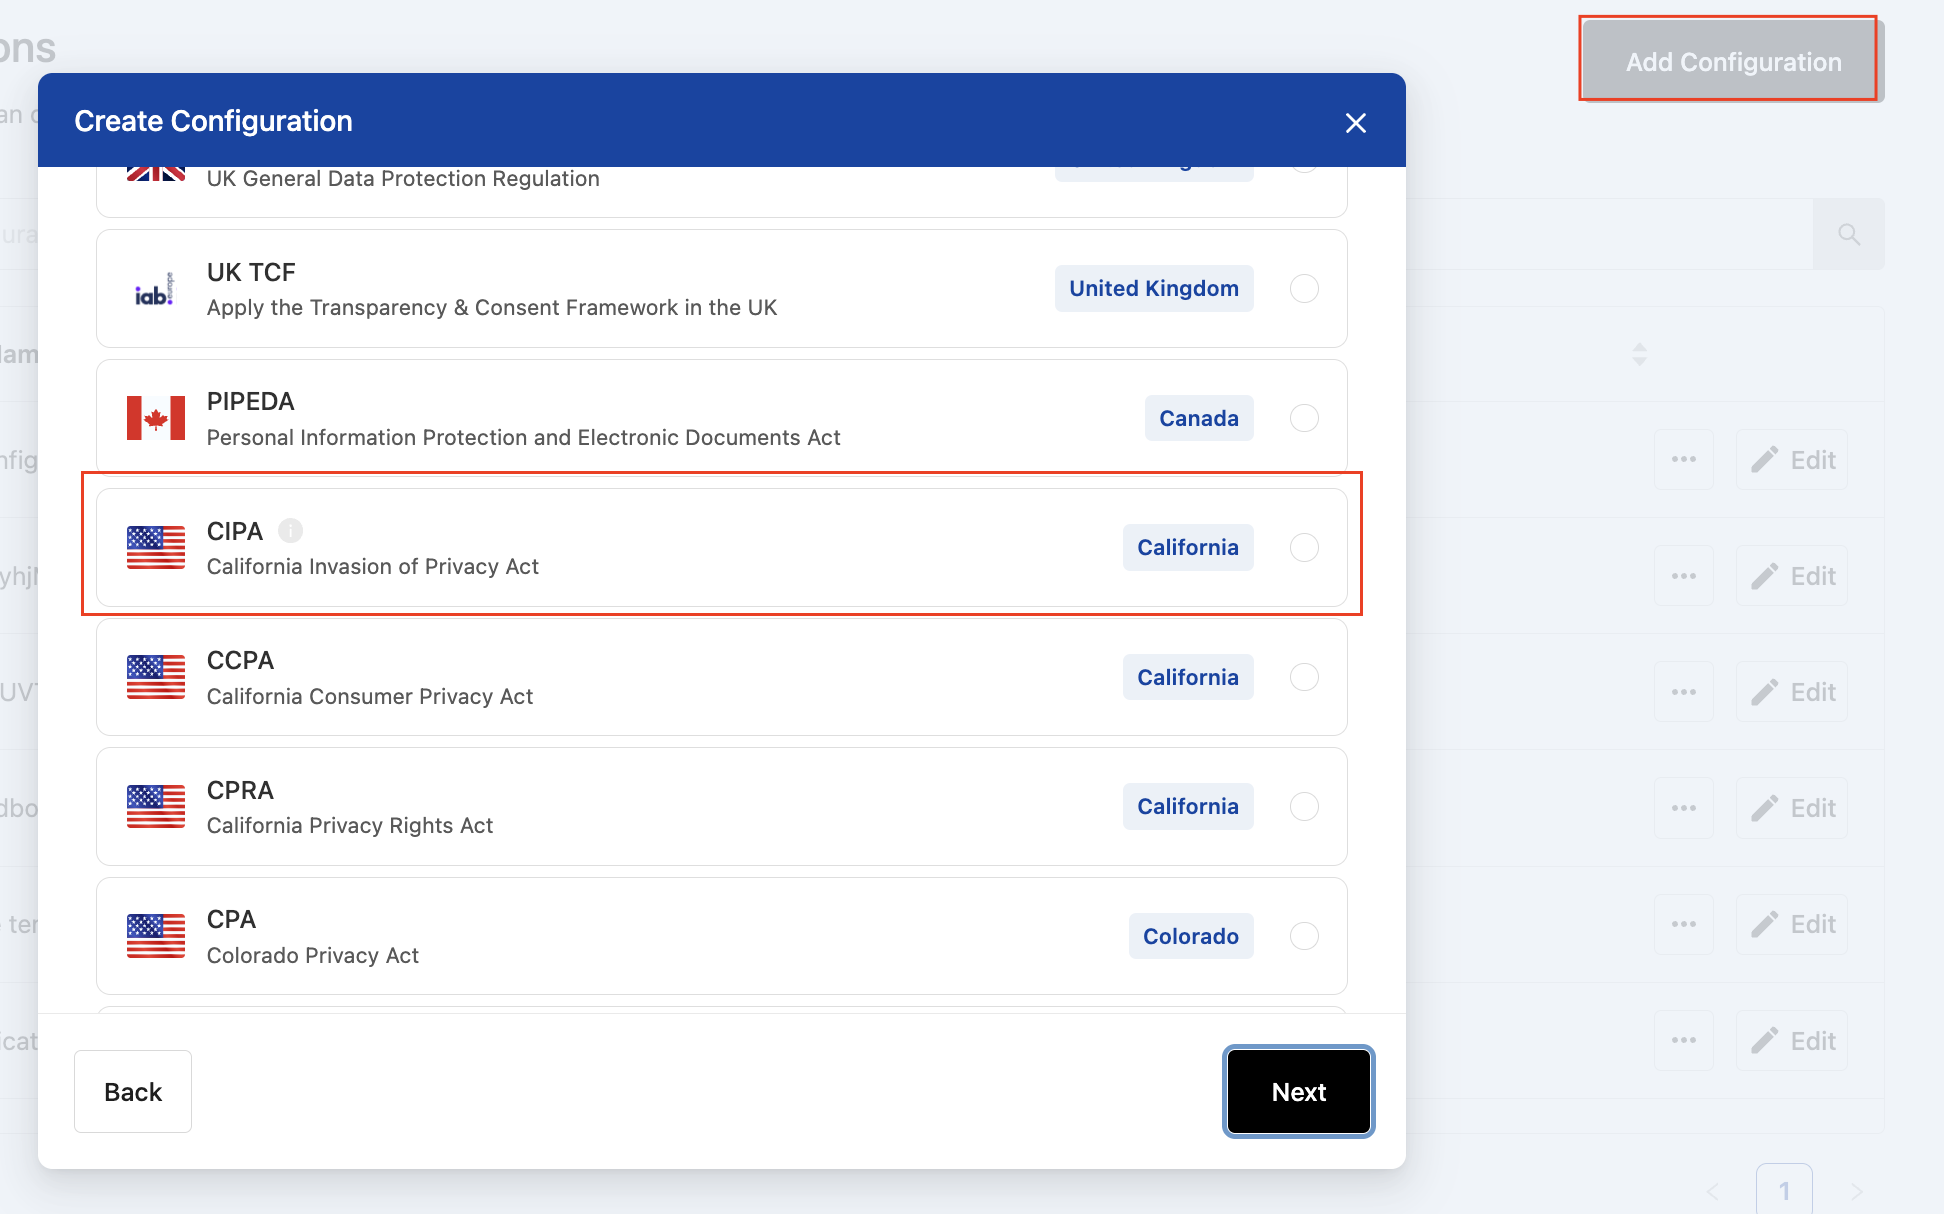
Select your company and select Add Configuration.
-
Add the domain name and select Next.
-
In the framework type list, select CIPA.
-
Add a name for the configuration and select Create Configuration.
-
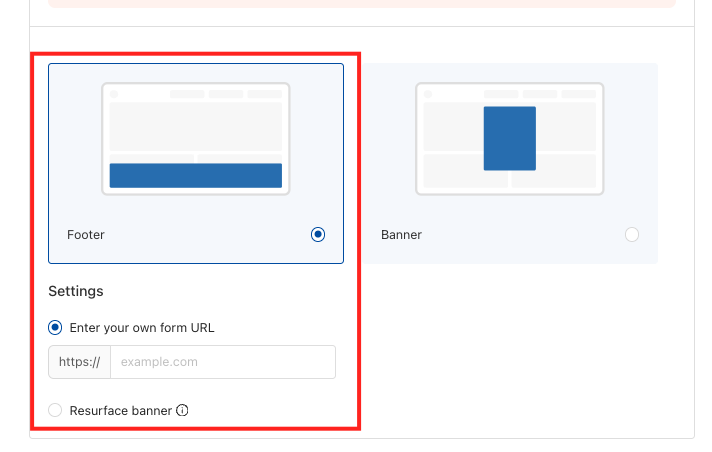
Review the settings that are automatically applied (opt-in for California, prior consent enforcement). You can adjust individual settings if needed.
Configure the "Do Not Sell or Share" link
CIPA requires every website that collects personal data from California residents to display a visible "Do Not Sell or Share My Personal Information" link. This section explains how to add and configure that link.
Before you begin, plan the following:
-
Decide where you want the link to appear: in a persistent footer section at the bottom of the page, or inside the consent banner itself.
-
If you plan to use your own opt-out form, have the URL ready.
To configure the "Do Not Sell or Share" link, follow these steps:
-
Open the configuration and navigate to the Appearance tab. Navigate to the Do Not Sell or Share Options section.
-
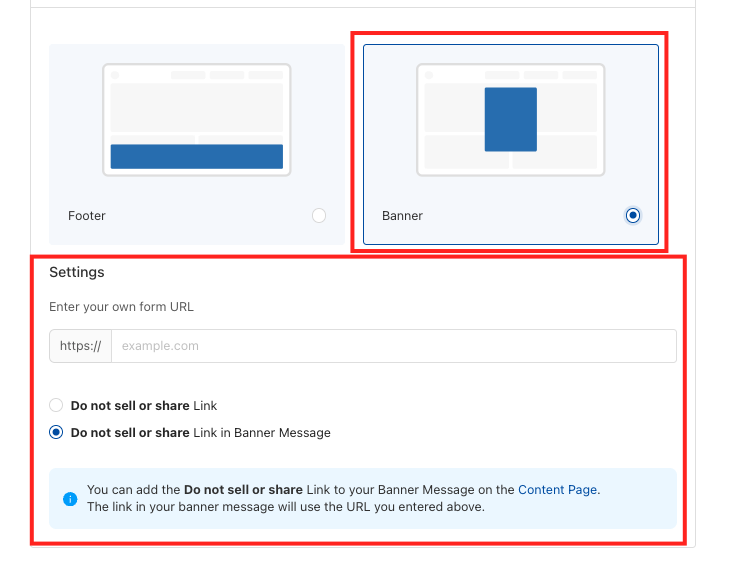
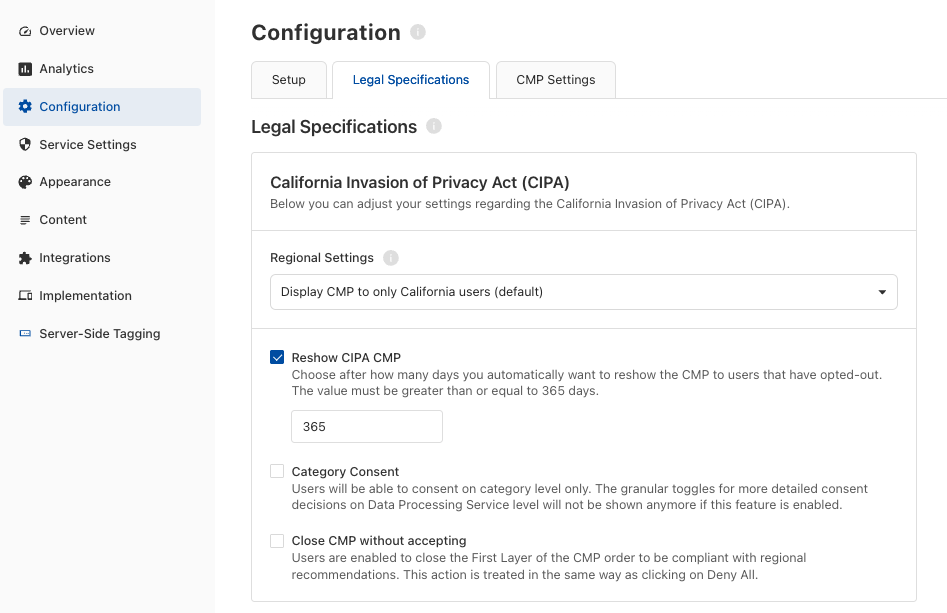
Select a display layout — Footer or Banner:
- Footer: Shows the "Do Not Sell or Share" link at the bottom of every page. The link stays visible at all times, independent of the consent banner
- Banner: Adds the "Do Not Sell or Share" link directly into your existing consent banner. The link is visible when the banner appears.
-
Under Settings, choose how the link should behave. The available options differ by layout — see the tables below.
-
Footer layout — settings options:
- Enter your own form URL: Redirects the user to a custom Data Subject Request (DSR) opt-out form URL that you provide. Use this if you manage your own CCPA opt-out process.
- Resurface banner: Opens the Usercentrics privacy settings when the user clicks the link, letting them manage their consent preferences. Usercentrics generates the code snippet for you to copy and place on your website.
-
Banner layout — settings options:
- Enter your own form URL: Redirects the user to a custom DSR opt-out form URL. Displays the link as a standalone element within the banner.
- "Do Not Sell or Share" as a link: Adds a visible "Do Not Sell or Share" link within the banner that points to your configured URL.
- "Do Not Sell or Share" as a link in banner message: Embeds the "Do Not Sell or Share" link inline within the banner message text itself. See the note below (this option) before selecting this option.
If you select the "in Banner Message" option, the link becomes part of your banner copy. Make sure your banner message text is set up to accommodate it. Review the attention notice shown in the admin panel for further guidance.
-
-
If you selected Enter your own form URL, paste your opt-out (DSR) form URL into the input field that appears. The field validates the URL format in real time — it must start with https:// or http:// and implement the script and the redirection function. For information about the Usercentrics Data Subject Request form, see Data Subject Requests.
-
If you selected the Resurface banner (Footer layout only), copy the code snippet displayed and add it to your website. This places the "Do Not Sell or Share" link where visitors can find it.
-
Save and Publish your banner configuration.
How the template works
After saving the configuration, the following happens:
-
California visitors see an opt-in consent banner before any tracking scripts load.
-
No pixels, session replay tools, chatbots, or ad scripts run until the visitor gives consent.
-
Visitors from other US states continue to see your standard CCPA opt-out banner — their experience is unchanged.
-
Visitors outside the US are unaffected.
What happens after you save the link settings
After saving:
-
Footer layout: the link appears where you placed it on your website.
-
Banner layout: the link appears within your consent banner when it displays to visitors.
-
For California visitors, the link lets them opt out of the sale or sharing of their personal data as required by CCPA.
Troubleshooting
California visitors are still seeing the opt-out banner, not opt-in
Confirm the CIPA template is saved and published. Check that geo-targeting is enabled for California IP addresses in your configuration.
Tracking scripts are firing before consent for some California visitors
Check that all services in your Usercentrics configuration are set to require consent before running. Any service set to run without consent will bypass the prior consent enforcement.
Non-California US visitors are seeing the opt-in banner instead of opt-out
Verify that your geo-targeting rule is scoped to California only and not set to apply to all US visitors.
The URL field shows an error
Make sure the URL starts with https:// or http:// and does not contain spaces or unsupported characters.
The banner layout option is hidden
The banner layout is not available when Resurface banner behavior is selected. Switch to Enter your own form URL first, or select the banner layout before choosing your settings option.
The link does not appear on my website after saving
Clear your browser cache and reload the page. If you are using the Resurface banner behavior option, confirm you have placed the code snippet on your website.