Enable auto-blocking for your website
Auto-blocking prevents third-party services from loading on your website until your visitors give consent. No manual code editing is required.
This page describes how you can enable this feature for a Usercentrics configuration.
Prerequisites
-
You must have an Essential, Plus, Pro, Business or Corporate plan. See the "Not sure if your plan qualifies?" box below on how to check if this feature applies to you.
-
This feature may not be available to you depending on the version of your Usercentrics user interface. See the "Not sure if your plan qualifies?" box below on how to check if this feature applies to you.
-
Your website domain must be added to your Usercentrics configuration.
-
At least one domain scan must have run before you implement the scripts.
Not sure if your plan qualifies?
In Usercentrics, select the company, and then select the configuration you want to set up. Navigate to Implementation. If on the Script Tag tab you do not see the Auto blocking option, your current plan or UI version does not include this feature. 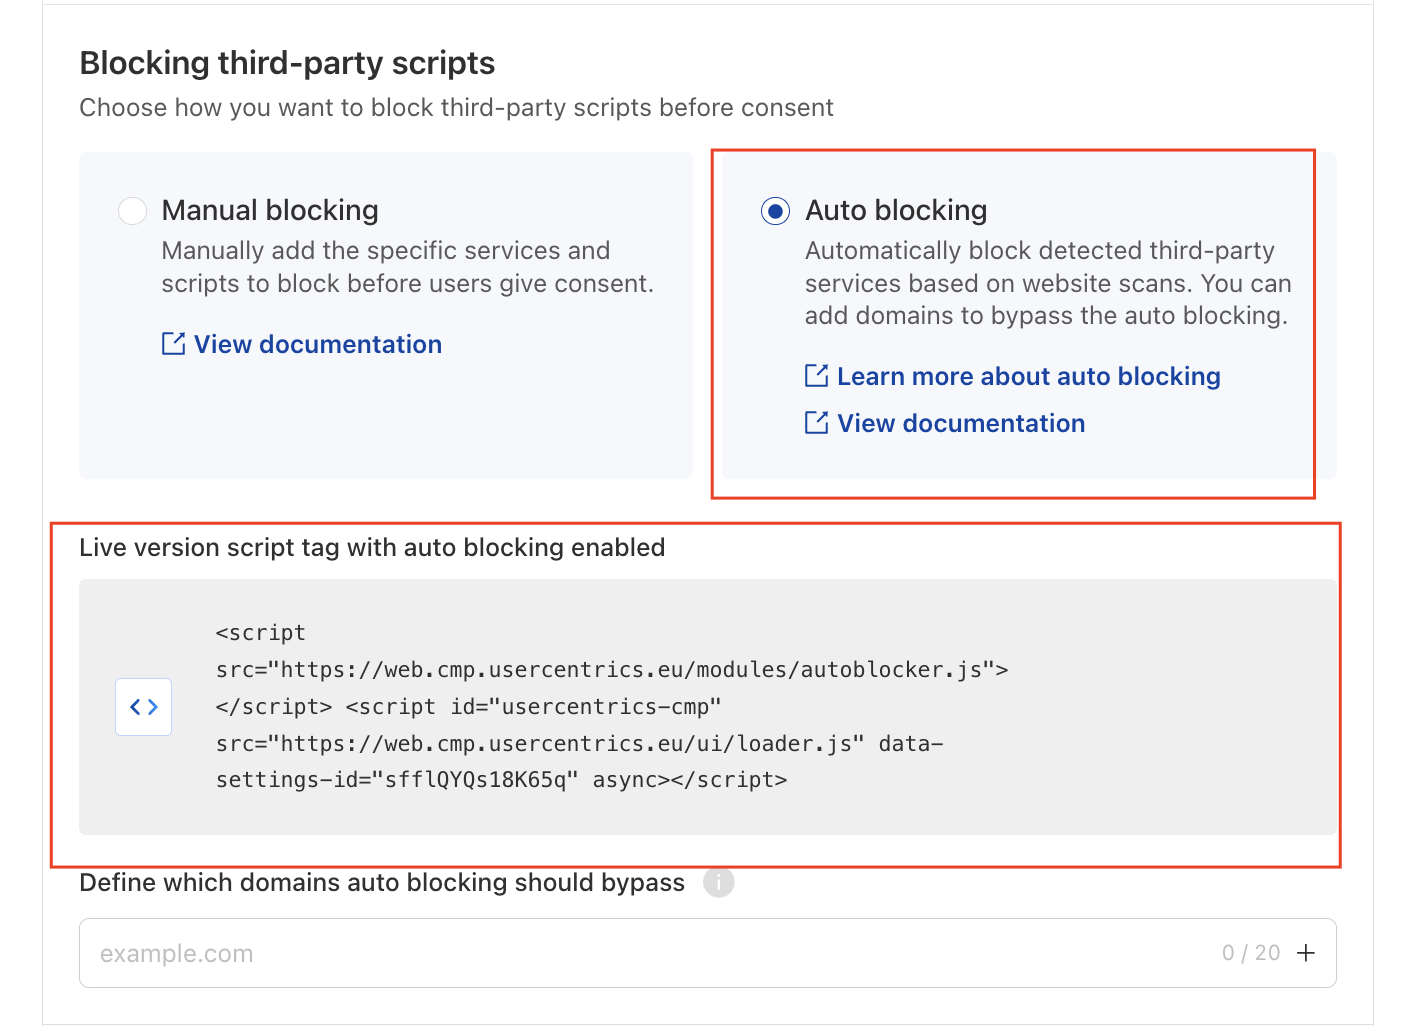
Enable auto-blocking
To enable auto-blocking, follow these steps:
- Add your domain to your configuration:
- Log in to the Usercentrics Account Interface.
- Select the company for which you want to set up auto-blocking.
- In the Configurations tab, select the configuration you want to change.
- Select the Configuration tab. Under Domain Management, confirm that your website's fully qualified domain name is listed (for example,
www.example.com).
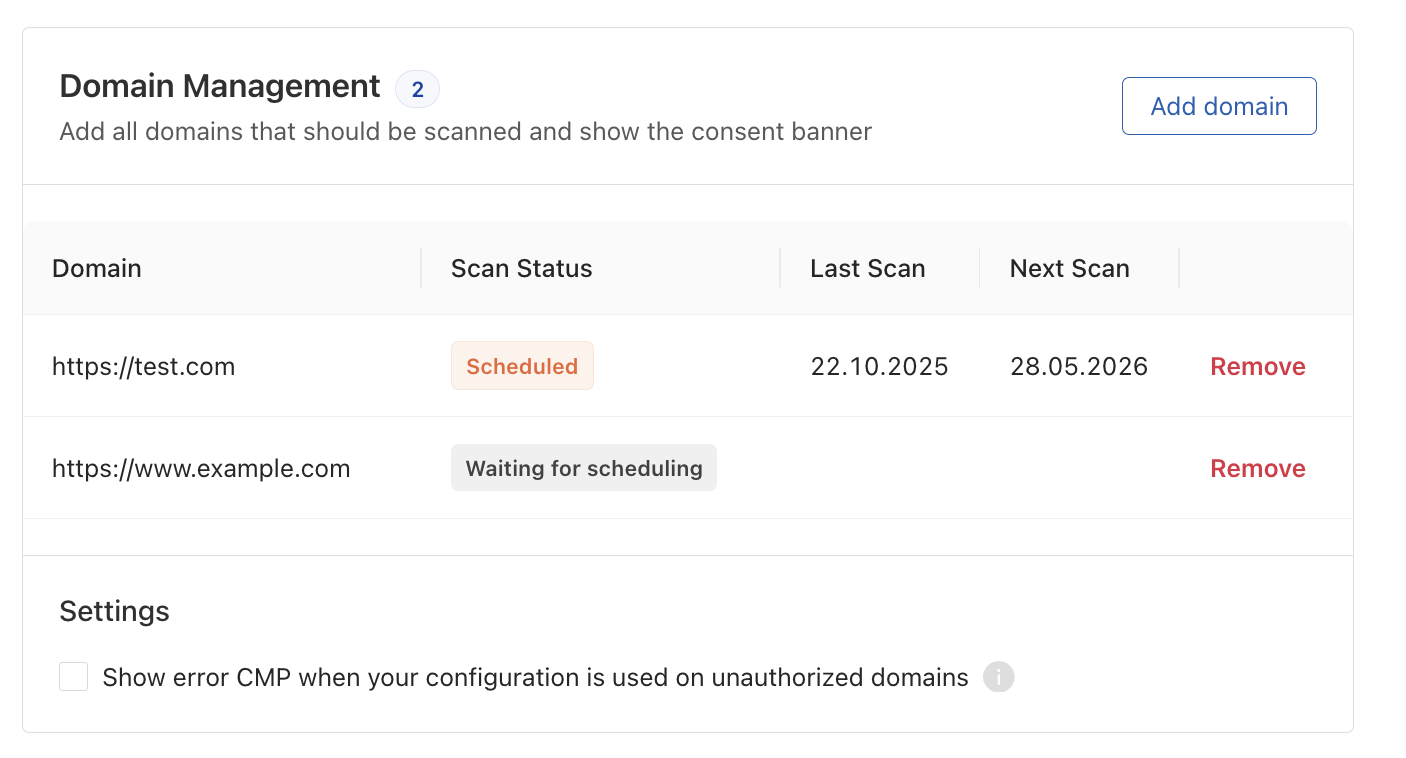
- Click Save Draft if you made any changes.
- Run a domain scan:
- Navigate to Service Settings > DPS Scanner.
- Click Start Scan to scan your domain(s).
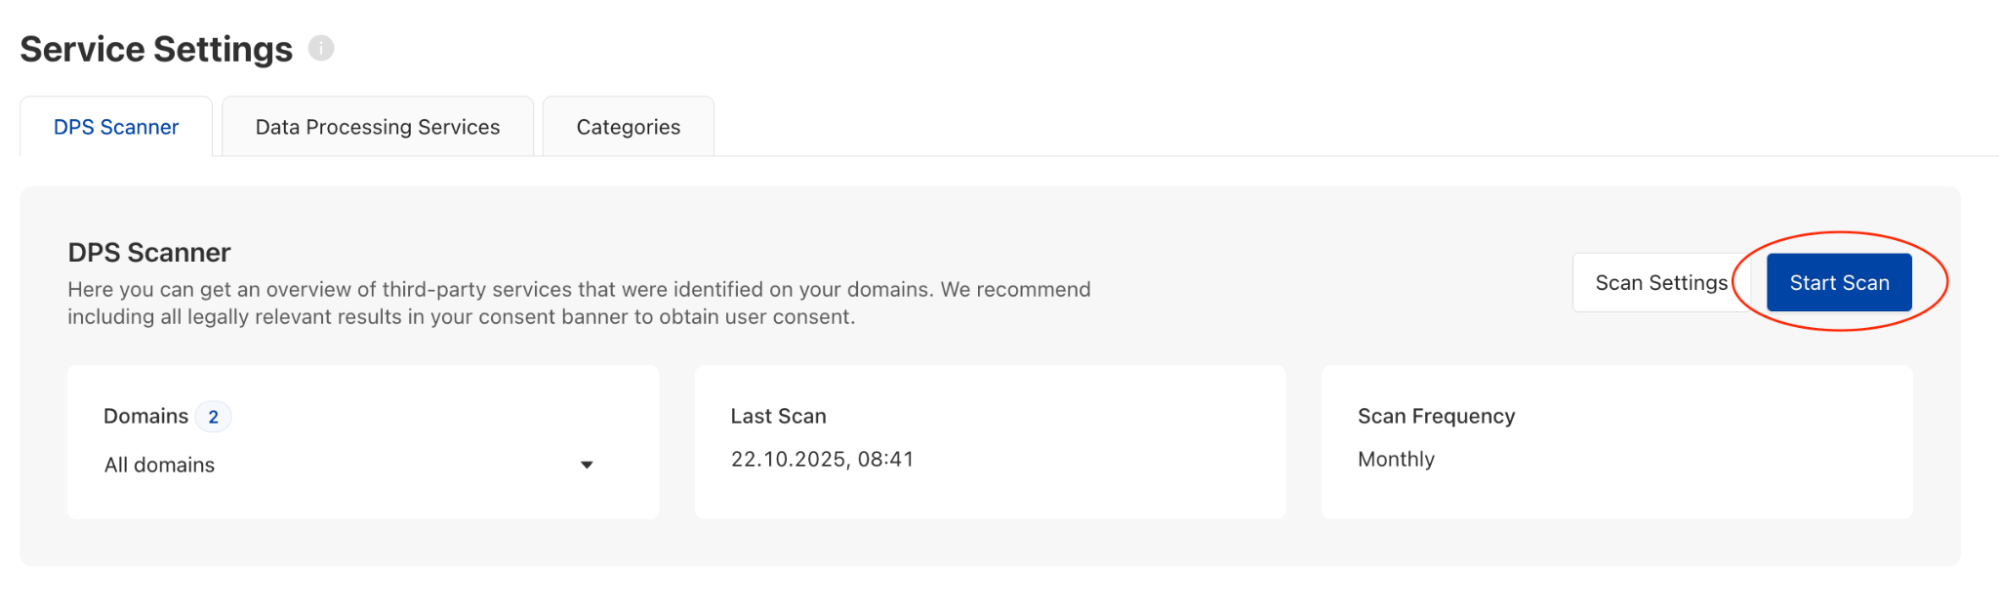
- Wait for the scan to complete before continuing. This may take a few minutes.
-
Review and add detected services:
-
Once the scan finishes, review the list of detected third-party services.
-
For each service you want to manage with consent, or if a service appears as Unknown, see the Mapping unknown services to a Data Processing Service guide.
-
Click Save Draft when you have finished adding services.
-
-
Enable auto-blocking and copy the scripts:
-
In the Admin Interface, go to Implementation > Script Tag.
-
Select Auto blocking to enable the feature.
-
Copy the two script tags that appear.
-
-
Add the scripts to your website:
-
Open your website's template or theme editor.
-
Paste both scripts inside the <head> section of your HTML, before any other third-party scripts.
Important: In your website's code, the auto-blocking script (autoblocker.js) must appear before the main CMP script (loader.js). Paste them in the order shown on the UI when copying the script.
Using Google Tag Manager? Auto-blocking works most reliably when scripts are placed directly in your website's source code. If you load third-party services through Google Tag Manager (GTM), manage consent through GTM's consent mode or tag triggers instead. Contact support if you need guidance on this setup. -
Save and publish your changes.
-
-
Verify that auto-blocking is working:
-
Open your website in a browser.
-
Before accepting consent on the banner, open your browser's developer tools (F12) and check the Network tab.
-
Confirm that blocked third-party services show no network requests until consent is given.
-
How does auto-blocking work?
Once auto-blocking is active, your website works like this:
-
Before consent: Third-party scripts are prevented from running. iframes and images that belong to tracked services do not load.
-
After consent: Services the visitor has approved load immediately, in the same order they appear in your website's code.
-
Automatic updates: Every time a new scan runs and you add newly detected services to your configuration, the auto-blocking rules update automatically. No code changes are needed on your end.
One service can cover multiple resources on your page, and a single resource can also require consent for more than one service. In that case, the visitor must consent to all associated services before that resource loads.
Troubleshooting
This section gives you guidance on how to troubleshoot common issues.
No auto-blocking option
Problem: the auto-blocking option does not appear in the Implementation tab.
Fix: Your account plan does not include this feature. Auto-blocking is available on Essential, Plus, Pro, Business and Corporate plans only. Contact your account manager to discuss upgrading.
Unknown service
Problem: After a scan, some services are listed as "Unknown" in the Service column. The status of these services is Todo in the DPS Scanner tab (under Service Settings). This means the scanner detected a service network request but could not match it to a predefined Data Processing Service (DPS).
Fix: Unknown services must be mapped to a DPS before they can appear on your consent banner or be recognized by the auto-blocking feature.
You have two options:
- Map the service manually — If you recognize the service, you can either assign it to an existing DPS or choose from our predefined catalog, alternatively you can create a new custom DPS. To do this, click the Add Service link next to the unknown entry and choose the desired approach. Once mapped, the service status will update to Done automatically — no new scan needed.
- Ignore the service — If the service is not relevant or already represented in your configuration, you can choose to “ignore” it. It is best practice to ensure no services remain in Todo status.
For step-by-step instructions, see the following Help Center article: Mapping unknown services to a Data Processing Service.
A resource is not blocked by auto-blocking
Problem: A specific resource keeps loading even though auto-blocking is enabled.
Fix: Check whether the resource has a data-uc-allowed="true" attribute in your website's code. This attribute tells auto-blocking to always allow that resource. Remove the attribute if you want auto-blocking to manage it. Also confirm the service was added to your configuration after the most recent scan.
Auto-blocking stopped working
Problem: Auto-blocking stopped working after you updated your website.
Fix: Trigger a new scan from the DPS Scanner to refresh the auto-blocking configuration. If you were previously using an older version of the auto-blocking script, replace it with the current scripts from the Implementation tab and run a fresh scan.