Data Subject Requests
Data Subject Request (DSR) gives the visitors to your website a form to exercise their privacy rights, and gives you a dashboard in the Admin interface to handle the requests they submit. This page explains who can use the feature, how to set up the form, and how to manage incoming requests.
Privacy laws such as CCPA/CPRA and GDPR give people the right to control their personal data. With DSR, your website visitors (end users) can submit a request to:
- Access their data.
- Delete their data.
- Correct their data.
- Opt out of the sale and sharing of their data.
Each submitted request appears on the Dashboard tab of the Data Subject Request page, where you review and process it.
Availability
| Requirement | Details |
|---|---|
| Product | Usercentrics Web CMP. The feature isn't available for the App CMP. |
| Admin Interface version | The newest Admin Interface version. |
| Plan | Paid plans, and the 14-day free trial. If you switch to the Free plan, the feature is no longer available. |
| Legal frameworks | All legal frameworks except TCF and UK TCF. |
Set up the DSR form
To set up the form, follow these steps:
-
Open your configuration and go to Data Subject Request.
-
Go to the Form tab.
-
Turn on the Data Subject Request (DSR) form toggle. When the form is on, the page shows "Your form is active and accepting data requests from your website." When it's off, it shows "Your form is inactive and not accepting new requests."
-
Under Request types, select the request types users can submit:
- Access my data
- Delete my data
- Correct my data
- Do not sell/share my data
-
Under Form appearance, customize how the form looks:
- Title: The heading at the top of the form.
- Description: The text below the title.
- Submit button label: The text on the submit button.
- Custom logo URL: The address of the logo shown at the top of the form, for example
https://yourcompany.com/logo.png.
-
Under Requests delivery, set where submitted requests are sent:
- Email recipients: Add at least one valid email address.
- Email subject line: The subject of the notification email.
-
Under Add the form to your website, copy the form URL from Use form link manually. Add it wherever you want visitors to find it, such as your website footer, your privacy page, or a custom location.
-
Click Preview to check how the form looks.
-
Click Save Draft, then Publish.
What your visitors see
The following is a screenshot of the form:
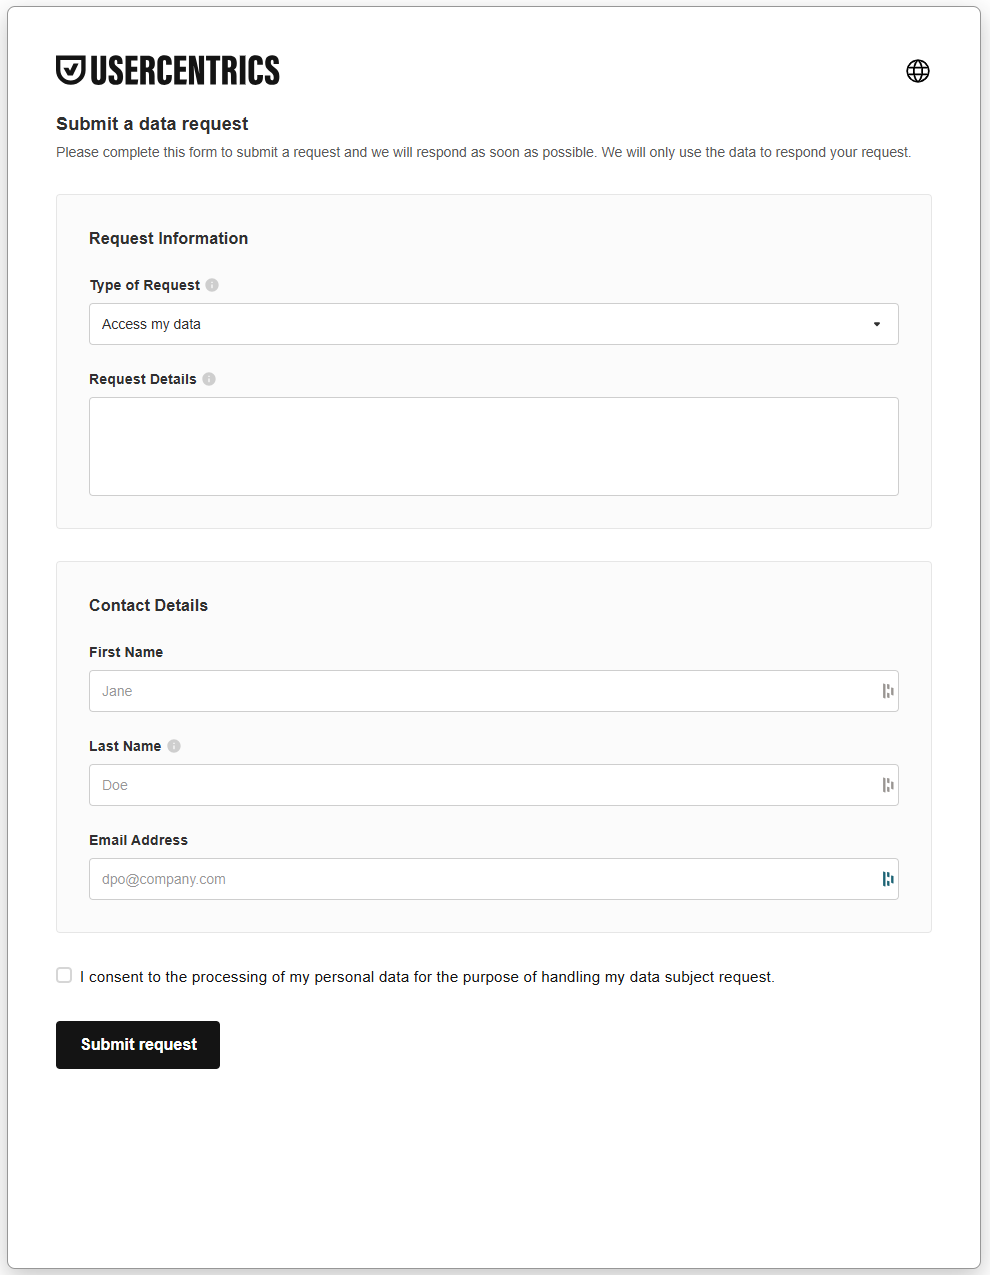
Visitors fill in the form with the following fields:
| Section | Field | Description |
|---|---|---|
| Request Information | Type of Request | A drop-down with the request types you turned on. |
| Request Information | Request Details | A free-text box for more information about the request. |
| Contact Details | First Name | The visitor's first name. |
| Contact Details | Last Name | The visitor's last name. |
| Contact Details | Email Address | The address used to identify and contact the visitor. |
After submitting the form, the visitor receives an email to verify their email address.
The request appears right away under Data Subject Request > Dashboard with the status Needs verification. When the visitor verifies their email address, the status changes to New, and the emails defined at the setup in the Email recipients field receive a notification about the request.
Manage requests on the dashboard
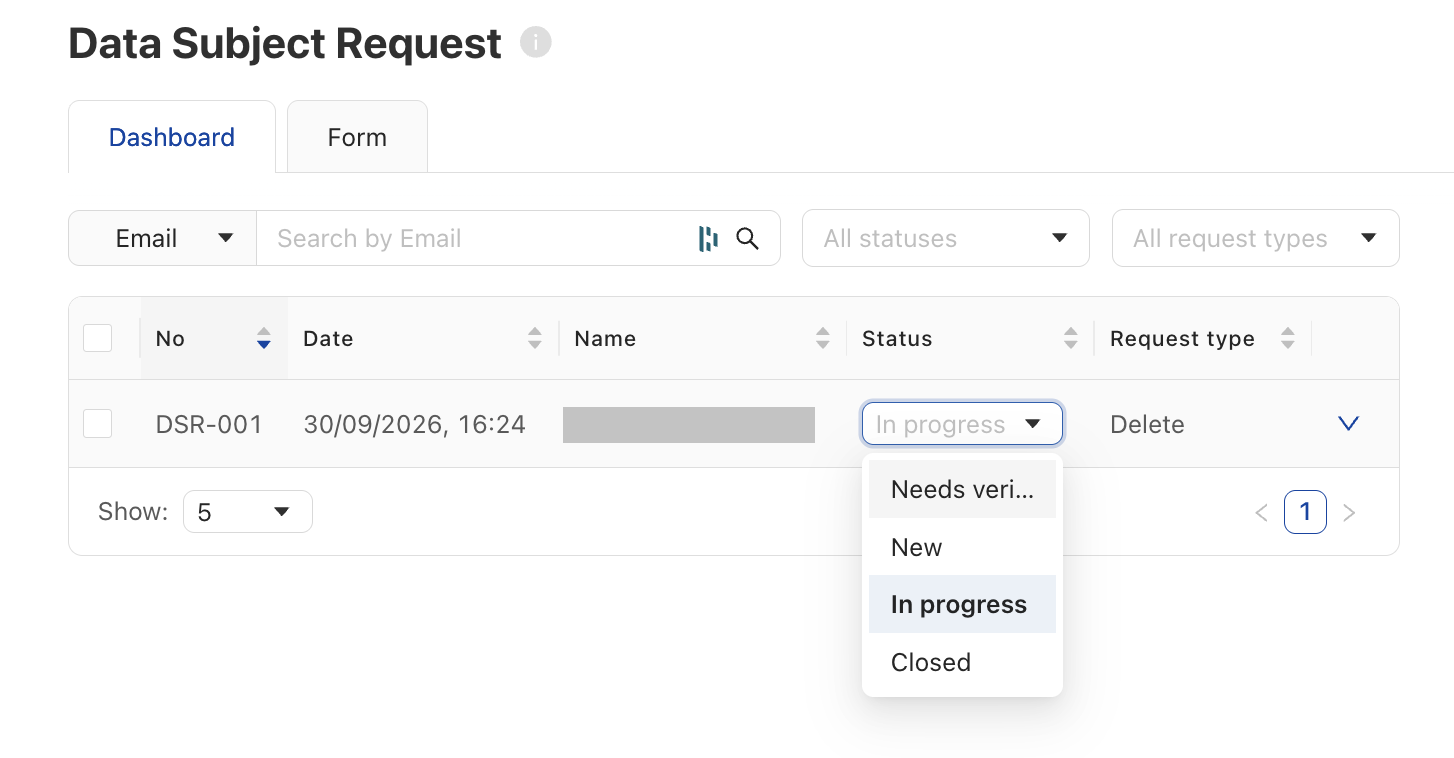
Submitted requests appear under Data Subject Request > Dashboard. Each request has its own row with these columns:
| Column | Description |
|---|---|
| No | A unique request number, for example DSR-010. |
| Date | The date and time the visitor submitted the request. |
| Name | The name the visitor entered. |
| Status | The processing status of the request. Change it with the drop-down in the row. The available statuses are listed below the table. |
| Request type | The type of request: access, delete, correct, or do not sell or share. |
| Details | Information that the requester typed into the Request Details field on the form. |
| Email address of the visitor. | |
| Controller ID | The controller ID that is in the banner when the visitor initiated the request, if you are using the CMP banner (ID to request consent data field). |
The statuses are:
- Needs verification: The visitor hasn't yet confirmed their email address. This status is set automatically when the visitor submits the request. You aren't notified yet.
- New: The visitor confirmed their email address. This status is set automatically when the visitor confirms their email address.
- In progress: You're working on the request.
- Closed: You've finished handling the request.
You can also change the status manually with the drop-down in the row.
When you change the status of a request, the visitor receives an email about the update.
To find a request:
- Search by email: use the search field above the table.
- Filter by status: use the All statuses drop-down.
- Filter by request type: use the All request types drop-down.
- Sort: click a column heading with sort arrows (No, Date, Name, Status, Request type).
Emails the feature sends
The DSR feature sends these emails:
- Confirmation to the visitor: After a visitor submits the form, they receive an email with a link to confirm their request. A request is valid only after the visitor confirms it.
- Notification to you: After the visitor verifies their email address, each address in Email recipients receives a notification about the request.
- Status update to the visitor: When you change the status of a request, the visitor receives an email about the update.