Google Tag Manager Configuration
Prerequisites
Before following this documentation, we assume you have:
- Created a Google Tag Manager account.
- Created a Google Tag Manager container on you website.
- Inserted the Google Tag Manager script into your website.
-
Inserted your Usercentrics script into your website. Learn how to do this here.
You can also directly integrate the Usercentrics Script via the Google Tag Manager. Usercentrics does NOT recommend this. However, you can learn how to do it here.
How Google Tag Manager works
Read the following information if you are new to Google Tag Manager implementations:
- Google Tag Manager helps you configure when the Javascript tags on your website are activated.
- Each tag needs to have at least one trigger.
- Triggers listen for certain website events (e.g. the website is fully loaded). Once this event takes place the trigger determines if the tag is activated.
- Triggers can be firing or exception triggers:
- Exception triggers determine when a tag is NOT fired and take precedence over other triggers.
- Firing triggers determine when a tag is fired.
- Triggers can be reliant on variables. The firing of a tag will be blocked, if a condition based on the value of such a variable is not met.
- Usercentrics uses a special type of variable, a data layer variable, to communicate between your Google Tag Manager settings and your CMP.
Adding data-processing technologies
Note
This documentation will use Google Analytics 4 as an example. However, the following process needs to be repeated separately for each technology.
- Replace "Google Analytics 4" in the naming of tags, triggers and variables with the name of the technology you are currently implementing, e.g Matomo.
If you already have a Google Analytics 4 tag in your Google Tag Manager configuration, you can jump to the Create a new Google Analytics variable section.
Google Consent Mode
Important
The Google Consent Mode is activated by default in the Admin Interface. To deactivate the Google Consent Mode, go to the Admin Interface under Configuration / CMP Settings [CMP V2]. As the implementation differs for the Google Tags supported by the Google Consent Mode, please see our technical documentation for more information on the Google Consent Mode and the correct templates to use with your CMP.
Create a new Google Analytics 4 tag
- Navigate to "Tags" in the side-menu and then click on "New".
- Select "Google Analytics" as the tag type
- Choose "Google Tag"
- Name it "Google Analytics 4 Tag".
- Enter your Measurement ID in the "Tag ID" field (You can read more here)
- Navigate to "Tag firing options" under "Advanced Settings" and select "Once per page".
-
Save "Google Analytics 4 Tag".
Explanation
- "Once per page" option means that, once consent is granted, the Tag will only fire once per page view. Event if consent is revoked and granted again the Tag will only fire if a page reload happens (which means a new page view).
- "Once per event" options allows you to fire the Tag every time an event happens and meets the specific triggering criteria. In Usercentrics case you can listen to the
consent_statusevent and trigger every time that event happens. The downside of this approach is that some tags inject scripts on the client's page and therefore, every time the event occurs the Tag will try to inject the script again which will cause a file load. In the worst case scenario, if for some reason we have consecutive consent updates the website may enter an "Out of memory" state. - "Unlimited" option should be selected if you want a certain technology to fire without any limitations (the downsides from "Once per event" option also apply here).
Taking the above options into account, Usercentrics recommend the "Once per page" setup.

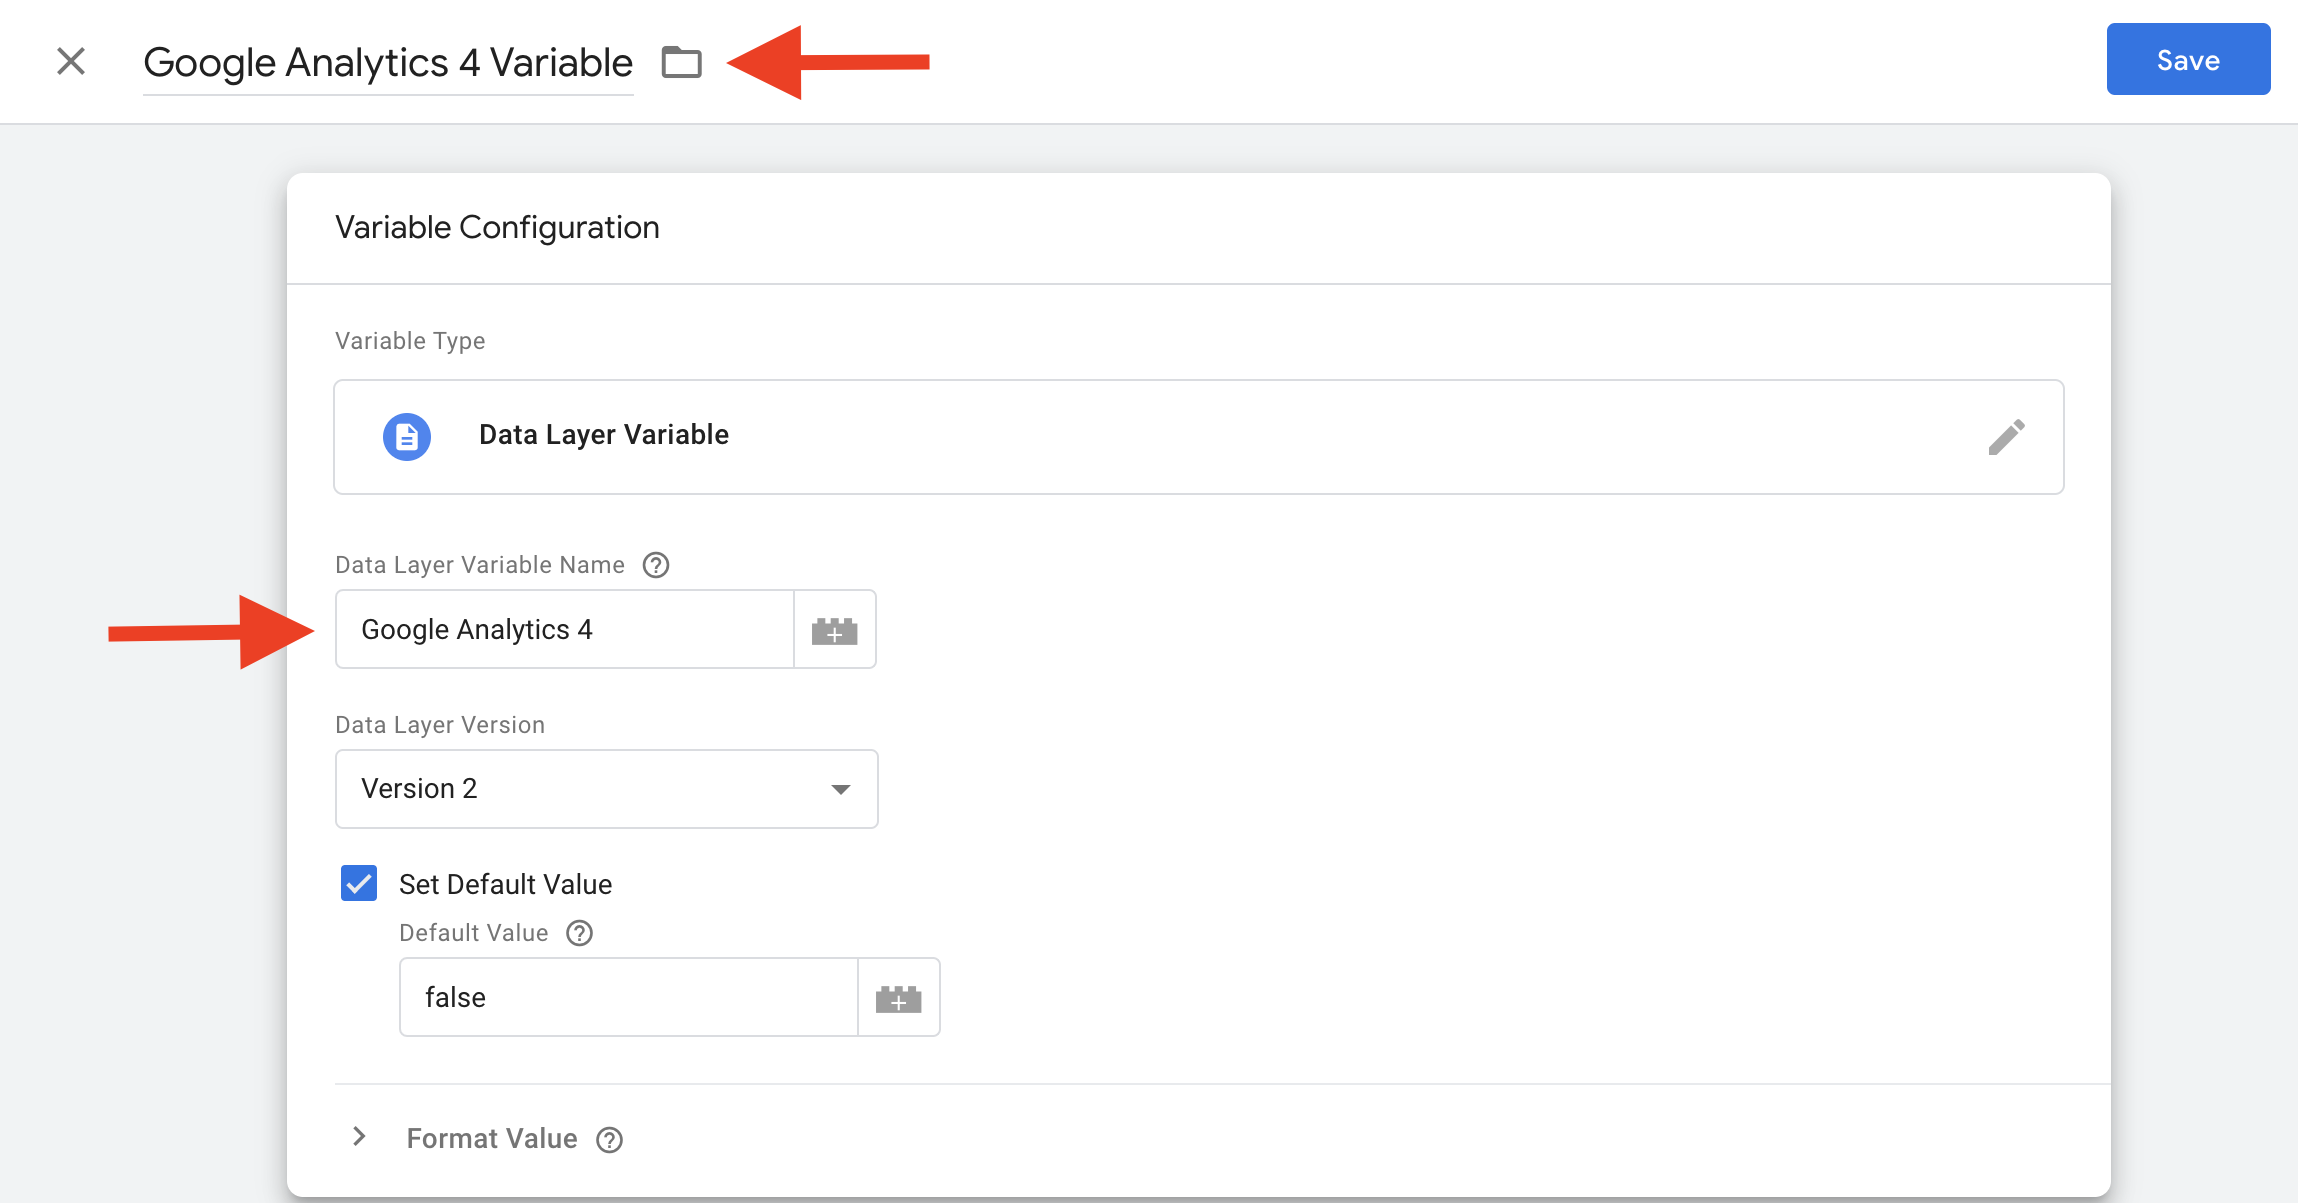
Create a new Google Analytics 4 variable
You have to create consent default status variables for each of your non-IAB vendor script tags so that they are not triggered without consent.
- Navigate to "Variables" in the side-menu (User-Defined Variables) and then click on "New".
- Add a new variable of type "Data Layer Variable".
- In the top left, name the variable "Google Analytics 4 Variable".
-
Under "Data Layer Variable Name", insert "Google Analytics 4".
Note
Correct spelling, hyphenation and capitalization are mandatory for this field. Every technology must be added the way it is spelled in the Usercentrics Admin Interface. Here: "Google Analytics 4".
-
Tick "Set Default Value" and set the default value to false.
- Save "Google Analytics 4 Variable".
Create a Google Analytics 4 trigger
Note
There are several ways to implement this logic. Usercentrics recommends the following option, however, depending on your setup, other structures might be more reasonable.
For Basic Google Consent Mode:
- Navigate to "Triggers" in the side-menu and click on "New".
- Add a new trigger of type "Custom Event".
- In the top left, name the trigger "Google Analytics 4 Trigger".
- Tick "Use regex matching" next to the "Event Name" input field
-
Under "Event Name", insert "(consent_status.*)".
Note
Correct spelling, hyphenation and capitalization are mandatory for this field.
-
Tick "Some Custom Events".
-
In the drop-down menus, set the following condition: "Google Analytics 4 Variable" contains true.
Explanation
The variable contains the user's consent information (variable=true - user opted in || variable=false - user opted out) for a specific technology. Hence, the trigger should only be fired (and tag therefore activated), if the variable=true.
-
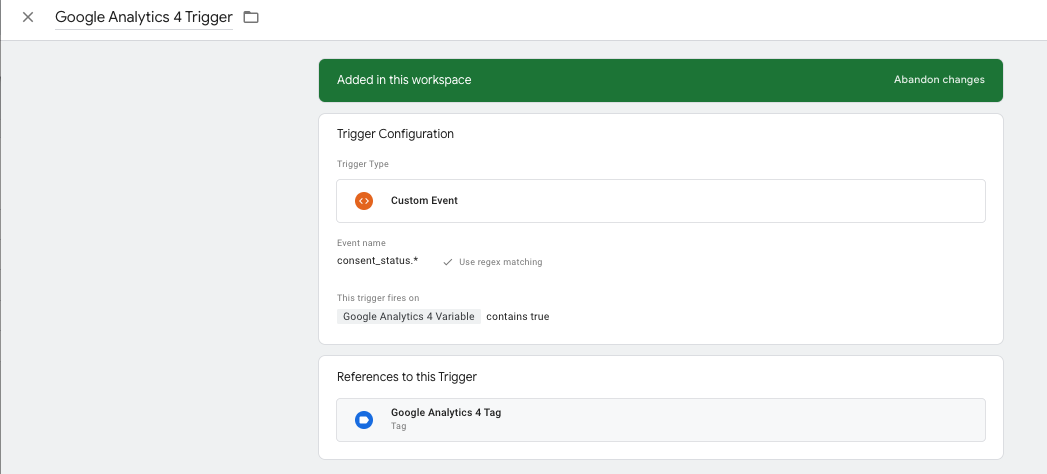
Save "Google Analytics 4 Trigger".
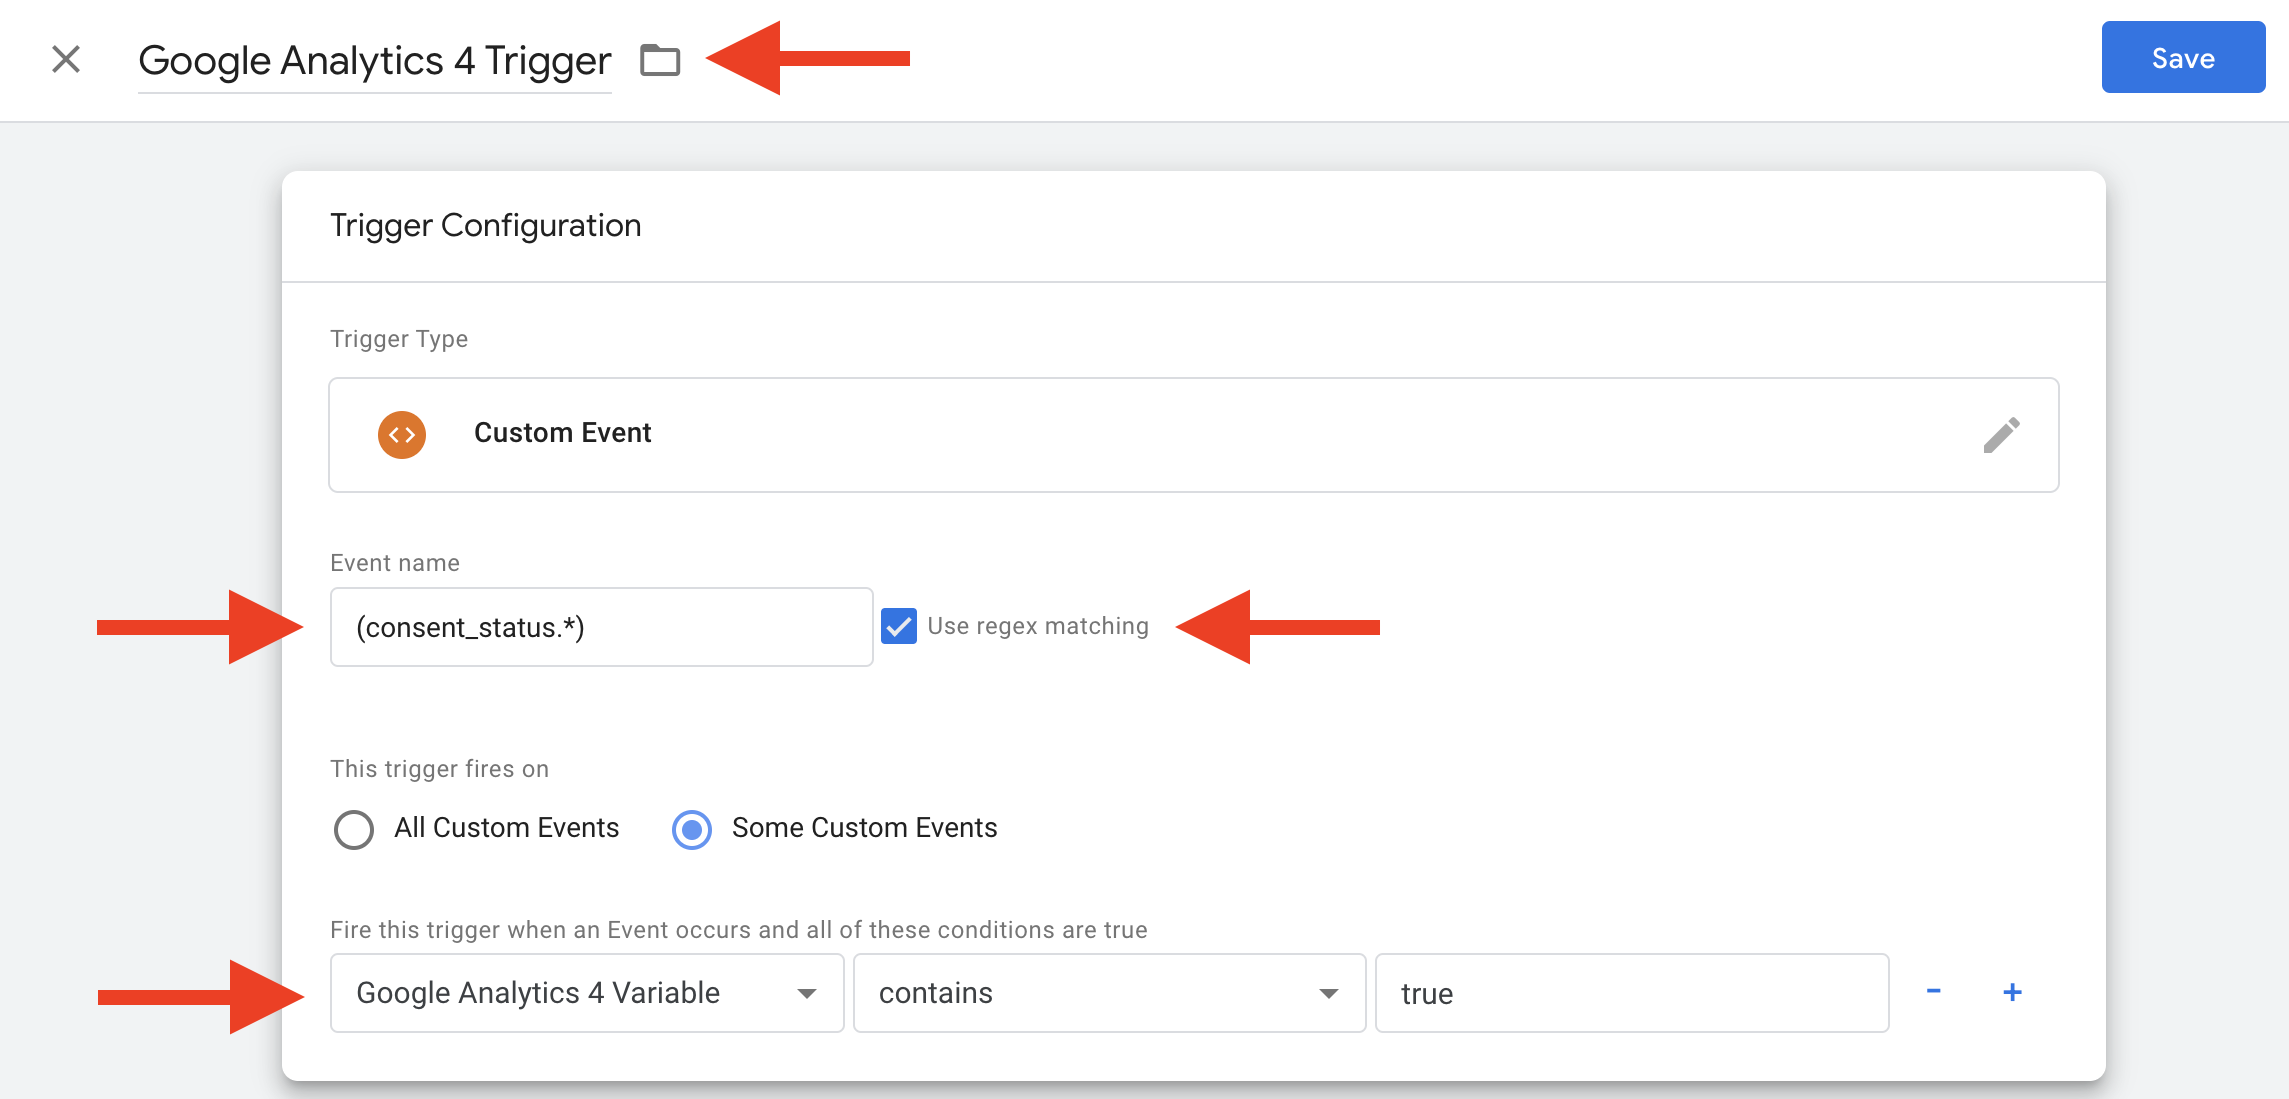
- Add the trigger to "Google Analytics 4 Tag".
For Advanced Google Consent Mode:
- Navigate to Tags, Google Analytics 4 Tag
- Add a new trigger of type "All Pages"
Note
Repeat this for each non-IAB vendor script in your Tag Manager.
Testing in Preview Mode
In order to make sure your Google Tag Manager setup works, you need to test it in preview mode.
- Activate preview mode by clicking on "Preview" in the top-right corner.
- Visit your website.
- Open the development tools of your browser and navigate to the "Network" tab.
- Network requests of the implemented data-processing technologies should not be visible, unless they were defined as "Essential" in your Admin Interface.
- Press "Accept All" on the Usercentrics CMP.
- Now network requests of the implemented data-processing technologies should be visible in the "Network" tab.