Your consent banner is one of the first things a visitor sees on your website, even before they read your headline or click through to a product page. For many brands, that moment feels like an interruption: a generic pop-up that looks nothing like the rest of the site.
We’ve always believed a well-designed consent experience isn’t just good UX: it’s good business. Research consistently shows that cookie banner design has a measurable impact on consent rates, and that nearly 70 percent of consent messages are ignored or dismissed when they feel out of place.
That’s why we’ve expanded the design capabilities in the Usercentrics Consent Management Platform (CMP). Customers can now choose from five flexible layouts for their consent notice, including the new compact Widget. All of them are configurable to match your site’s visual identity and experience goals. Here’s what each layout offers and how to get started.
Five Layout Options: One Privacy Compliance Engine
The Usercentrics CMP offers five layout formats for your consent notice. Each serves a different UX context — from high-visibility overlays to a subtle corner widget — and all of them run on the same compliance engine. The design changes; the legal requirements don’t.
Dialog
A centered modal overlay that puts the consent decision front and center, pausing the visitor’s experience until they make a choice. The highest-visibility option, which is typically used on first visits where granular consent is required under the GDPR or similar regulations.
Bar
A horizontal strip anchored to the top or bottom of the page. Less disruptive than a modal, so visitors can continue scrolling while the consent notice remains visible. Works well for returning visitor flows or lower-friction consent scenarios.
Wall
A full-screen consent gate that restricts access to content until the visitor has made a decision. The most assertive format, and best reserved for situations where content access is legitimately conditional on consent, such as subscription or registration flows.
Banner
A partial-overlay format, which is more prominent than a Bar, less blocking than a Dialog. A popular default for general-purpose consent on content-driven websites.
Widget (New)
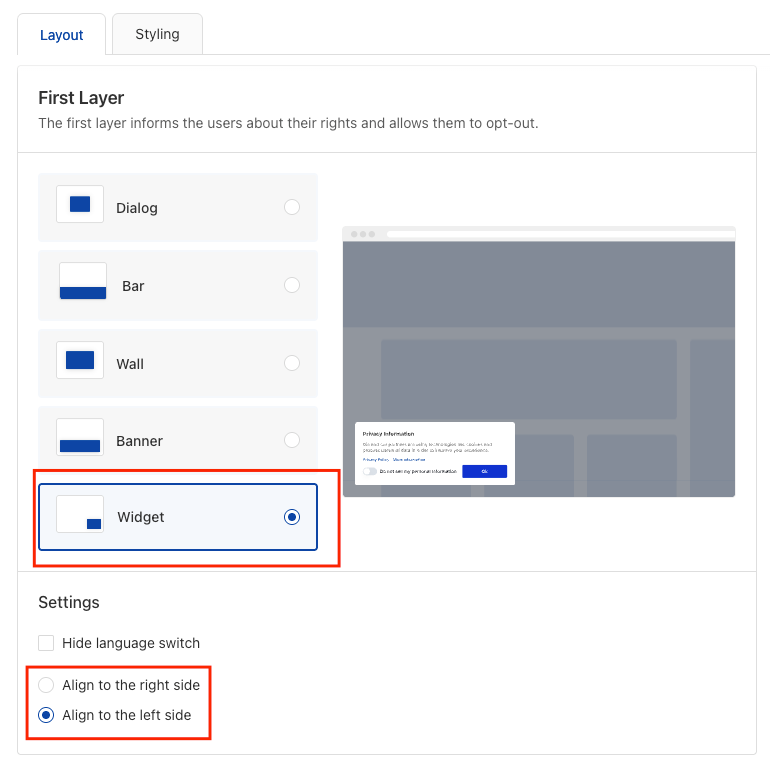
The most compact, non-intrusive format in the Usercentrics CMP. A small card anchored to the bottom corner of the screen on the left or right. It stays out of the way while keeping consent controls accessible.
Configuring the Widget
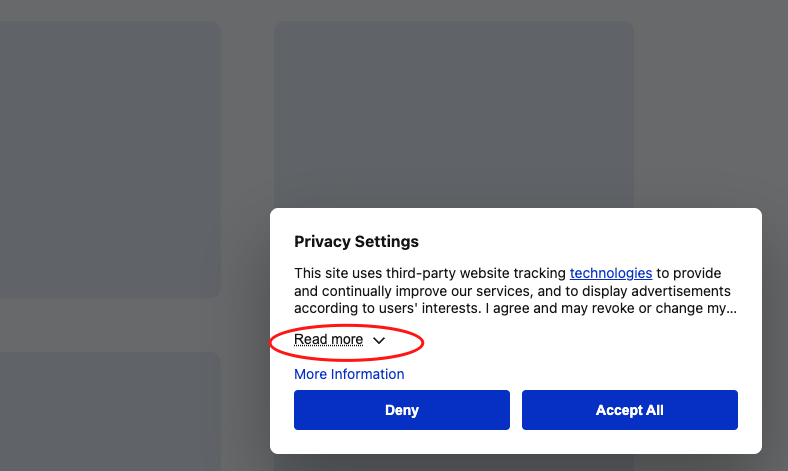
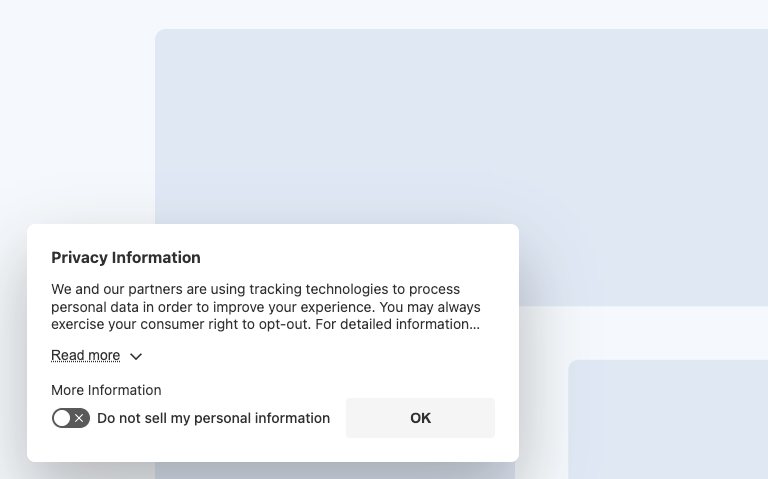
The Widget was designed for teams where site experience and privacy compliance are both priorities. When selected, visitors see:
- A compact card with a short privacy disclosure
- “Read more” expandable for full details
- “More Information” link
- Core Accept All and Deny action buttons
Minimal by design, but it fulfills the same disclosure requirements as the other layouts.
Three configuration options are available in the Settings panel:
Alignment: anchor the Widget to the bottom-right or bottom-left of the screen. If you have a chat widget or support button in the bottom-right corner, aligning to the left prevents overlap.
Language switch visibility: show or hide the language selector for multilingual sites. Showing it allows visitors to switch language before making a consent decision, which can affect the validity of consent for international audiences.
“More Information” link placement: inline within the message text, or as a standalone link below the consent copy.
To see how different companies approach banner design in practice, our cookie banner examples roundup shows eight real-world implementations.
Privacy Compliance in the EU and U.S.
Regardless of which layout you choose, every consent notice served via Usercentrics CMP operates within a shared compliance layer. The visual presentation adapts to your design choices; the legal structure does not.
All five layouts preserve the required elements for valid consent under the GDPR and ePrivacy Directive, including granular purpose disclosure, the ability to withdraw or change consent at any time, and compatibility with the IAB TCF v2.3.
For U.S. visitors, Usercentrics automatically applies the appropriate configuration based on applicable state law. This includes the “Do Not Sell or Share My Personal Information” disclosure required under the CCPA/CPRA and automatic recognition of Global Privacy Control (GPC) signals, which is required in an increasing number of states. No separate configuration is needed.
For DPOs and legal teams: The Widget format does not reduce the transparency or accessibility of consent information required under either EU or U.S. frameworks. The “Read more” expand and “More Information” link give visitors clear access to the full disclosure — in a format that simply takes up less screen real estate.
When to Use Each Layout
Choosing the right layout directly affects how visitors interact with your consent notice and, ultimately, your opt-in rates. Understanding the difference between opt-in and opt-out consent and which framework applies to your audience should also inform the format you choose.
Dialog: when front-and-center consent is your primary requirement: first visits on EU-regulated sites, high-value data collection, or any context where you want visitors to have actively engaged with the consent decision before accessing content.
Bar: when you want continuous visibility without blocking the visitor’s experience. Good for returning visitors or lower-friction scenarios.
Wall: when content access is genuinely conditional on consent. Creates the most friction; reserve it for situations where gating is legally or commercially justified.
Banner: as a flexible middle ground. Prominent enough to deliver visibility without fully interrupting the browsing experience. A strong default for most websites.
Widget: for content-first experiences where a minimal footprint matters: editorial sites, media platforms, e-commerce product pages, or as a secondary format for returning visitors who have already made an initial consent decision.
How to Set It Up
In the Usercentrics Admin Interface, open Configuration for your target domain and navigate to the Layout tab. Select your preferred format. For the Widget, the Settings panel will show alignment, language switch, and “More Information” link options.
Switch to the Styling tab to apply brand colors, fonts, and button styles; if you’ve already configured brand styling, the Widget inherits it automatically.
Save and publish, and the EU and U.S. rule sets apply automatically based on each visitor’s detected location.
If you’re using a CMS, we have setup guides for WordPress, Wix, and Webflow.
Available Now for All Customers
All five layout options are available now for all Usercentrics CMP customers, including EU and U.S. configurations. No additional setup or plan upgrade required. Open your dashboard and navigate to the Layout tab to get started.
If you’re not sure which layout fits your site, your Customer Success Manager can advise based on your compliance requirements, site experience goals, and consent rate data. You can also read our full guide to consent management for a broader overview of how CMPs work and what to look for.
What’s Next
We’re continuing to invest in making the Usercentrics consent experience more flexible, more brand-native, and easier to manage without developer dependencies.
Coming soon:
- Expanded Styling tab controls for per-element customization
- Layout A/B testing to help you optimize consent rates by format
- Shared brand token libraries for teams managing consent across multiple domains or brands
We’ll share more as these become available. In the meantime, try the layout options in your dashboard and let us know what you think.
Join our growing community of data privacy enthusiasts now. Subscribe to the Usercentrics newsletter and get the latest updates right in your inbox.
