

Deep dive into Google Tag Manager setup and configuration
Few tools are as powerful as Google Tag Manager (GTM) when it comes to website analytics and marketing automation. GTM is currently used by 48.1 percent of websites, and still holds a dominant market share (around 95 percent) in the tag management industry.

A properly executed Google Tag Manager setup is like adding a mission control centre to your website. You can manage all your tracking codes, analytics scripts, and marketing pixels in one centralized location without constantly editing site code.
This Google Tag Manager guide is not just about getting you up and running with a basic tag manager setup. It will also give you a comprehensive understanding of how GTM works, why it’s valuable, and how to structure it so your tracking remains accurate and scalable over the long term.
Whether you’re tackling your first GTM implementation or refining a more mature GTM setup, this guide will help you approach it with confidence.
We’ll cover Google Tag Manager basics like tags, triggers, and variables, but also look into advanced topics like Google Tag Manager custom event trigger setup, cross-domain tracking, and server-side GTM implementation.
How to use Google Tag Manager
To understand how to use Google Tag Manager, you first need to grasp its role in the broader ecosystem of website analytics, advertising and conversion tracking.
At its core, Google Tag Manager is a container-based system. That container — created during your Google Tag Manager account setup — is a hub for tracking tags, triggers, and variables you’ll need for your site or app.
Instead of opening up your website’s source code every time you want to make a change, you place all your tracking logic inside GTM and publish it from one centralized interface.
For those completely new to the platform, think of Google Tag Manager for beginners as a middleman between your website and all the marketing tools you use.
Instead of manually embedding different tracking codes for Google Analytics, Facebook Pixel, LinkedIn Ads, and more, you only need to install the Google Tag Manager code. From then on, using Google Tag Manager means adding, editing, or removing any number of tags without touching your site’s core code.
There’s a straightforward workflow to follow after your GTM setup.
1. Creating tags
These are the scripts or pixels that send data to third-party platforms. They can be pre-developed templates like Google Analytics 4 (GA4), Google Ads, or custom HTML snippets.
2. Configuring triggers
Triggers decide when the tags fire. This is where Google Tag Manager custom event trigger setup comes into play, enabling you to target specific user actions.
3. Defining variables
Variables capture and pass information to tags, such as URLs, the ID of a clicked button, or the value of a transaction.
4. Previewing and debugging
This is the process of simulating user activity and checking that tags are firing properly.
5. Publishing changes
After testing, new tags go live to your audience.
There is some flexibility around GTM implementation. You can use it for more than analytics, for example, deploying A/B testing scripts, adding heatmap tracking tools, or triggering custom marketing automation workflows.
It’s important not to overload your first container with tags. Overcomplicating your initial setup of Google Tag Manager can lead to firing conflicts, slow page speed, and complex reporting.
Having a clear roadmap and measurement plan is really important, especially when it comes to knowing which events, conversions, and behaviors you want to track.
Key components of GTM: tags, triggers, and variables
Before diving deeper into Google Tag Manager implementation, you need a solid grasp of GTM’s three core components: tags, triggers and variables.
These components are the building blocks of every Google Tag Manager setup, whether you’re conducting a basic tag manager setup for a small blog or a complex GTM implementation for an enterprise e-commerce platform.
Tags
A tag is a snippet of tracking code that communicates with third-party tools. You’ll often encounter pre-built tag templates for GA4, Facebook Pixel, and Google Ads. If you don’t want to use a templated tag, you can implement a Google Tag Manager code example into a custom HTML tag.
Triggers
Triggers are essential in any Google Tag implementation as they provide instructions on when to run. Common trigger types include page views, clicks, and form submissions, but you can create custom event triggers.
For example, if you only want your GA4 purchase event to fire after a successful checkout. In this instance, you’ll need to use a custom event trigger linked to an e-commerce transactionComplete event, if this is how your website’s Data Layer is structured.
Variables
Variables collect and store the data that triggers and tags fire. These are also really important for a successful GTM setup. Google Tag Manager comes with built-in variables, like page URLs, click texts, referrers and form IDs. For more advanced GTM implementation, user-defined variables like lookup tables and JavaScript variables can be used.
When setting up Google Tag Manager, it’s tempting to rush through creating tags without fully thinking through triggers and variables. But without the right trigger logic, tags may fire too often (causing data inflation) or not at all (causing missing data.) We recommend experimenting with a single tag, one trigger, and one variable first. Once you’ve confirmed in preview mode that your Google Tag implementation works, you can start layering in more complexity.
Step-by-step guide to setting up Google Tag Manager
Here, you’ll learn exactly how to set up Google Tag Manager from scratch. Whether you’re performing your very first Google Tag Manager account setup or reworking an older GTM setup, the steps below will walk you through the process.
1. Create your GTM account
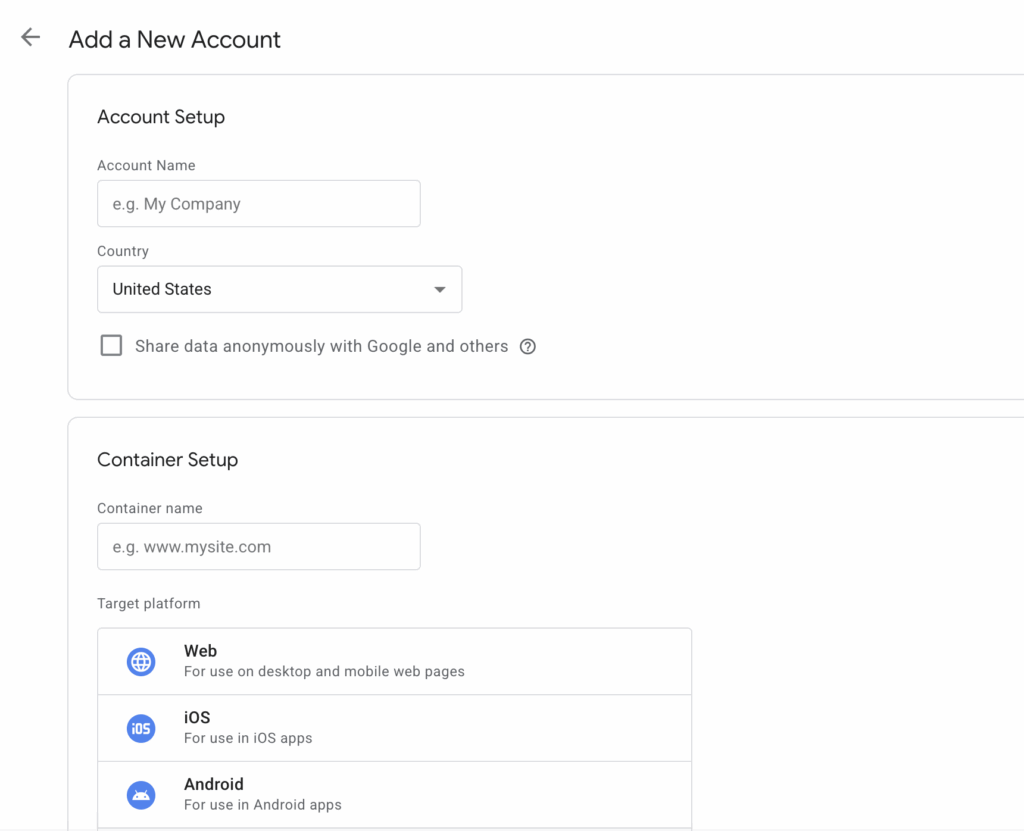
When creating your GTM account, you’ll need to provide information about your location, business name, website URL or app name, and target platforms, e.g. web, iOS, Android, etc.
For most GTM beginners, select web, unless you’re tracking a mobile app or implementing a server-side GTM setup.
Tip: Make sure to name things correctly to avoid confusion, especially if you’re managing multiple GTM containers across several sites.
2. Install GTM container snippet
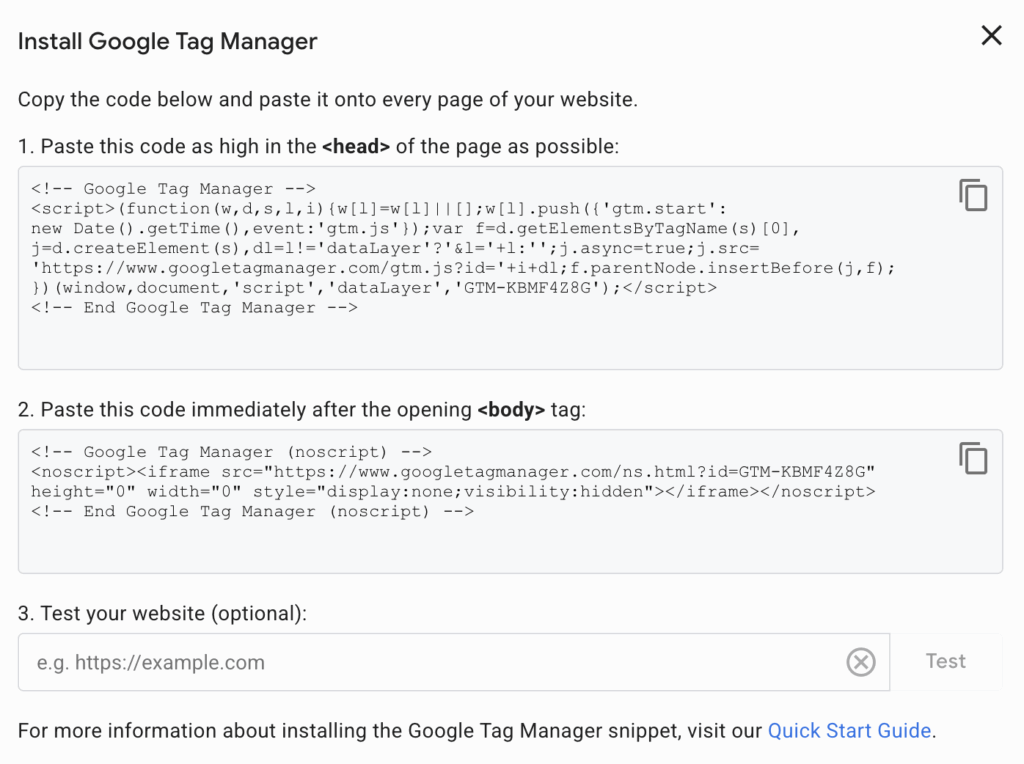
Once your account is created, GTM will give you a Google Tag Manager code example. One snippet goes inside the <head> tag of every page. Another snippet goes after the opening <body> tag.
If you’re working with a CMS like WordPress or Shopify, there are often built-in GTM fields or plugins that handle this for you. If you’re hardcoding, give your developer these snippets to embed sitewide.
This installation is the foundational step of Google Tag implementation, which enables GTM to load and manage tags on your site. Without this, none of your future GTM implementation work will take effect.
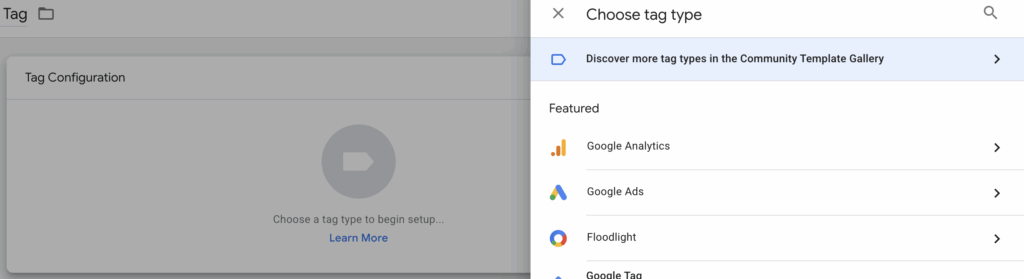
3. Add first tag (basic tracking)
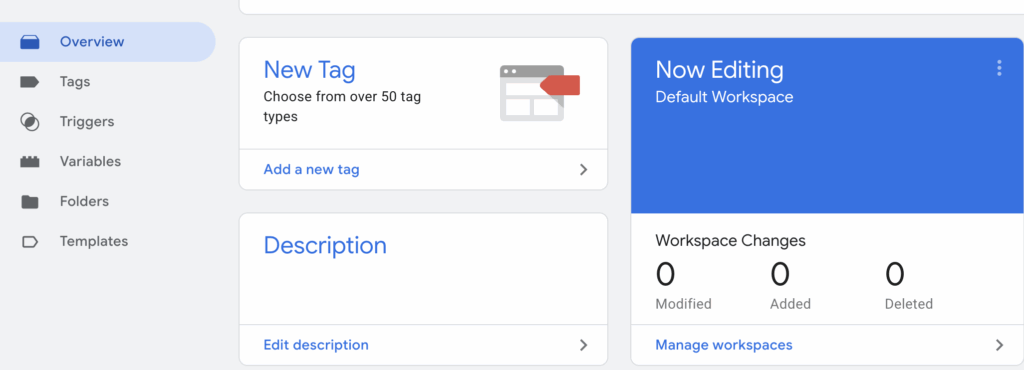
This is the first step in the basic tag manager setup. From here, you can build event tracking, conversions, and more. To add your first tag, follow these steps:
- Select Add a New Tag
- Choose Google Analytics: GA4 Configuration from the tag templates
- Enter your GA4 Measurement ID (found in the GA4 property settings)
- Set the trigger to All Pages to track every page view
4. Configure first trigger
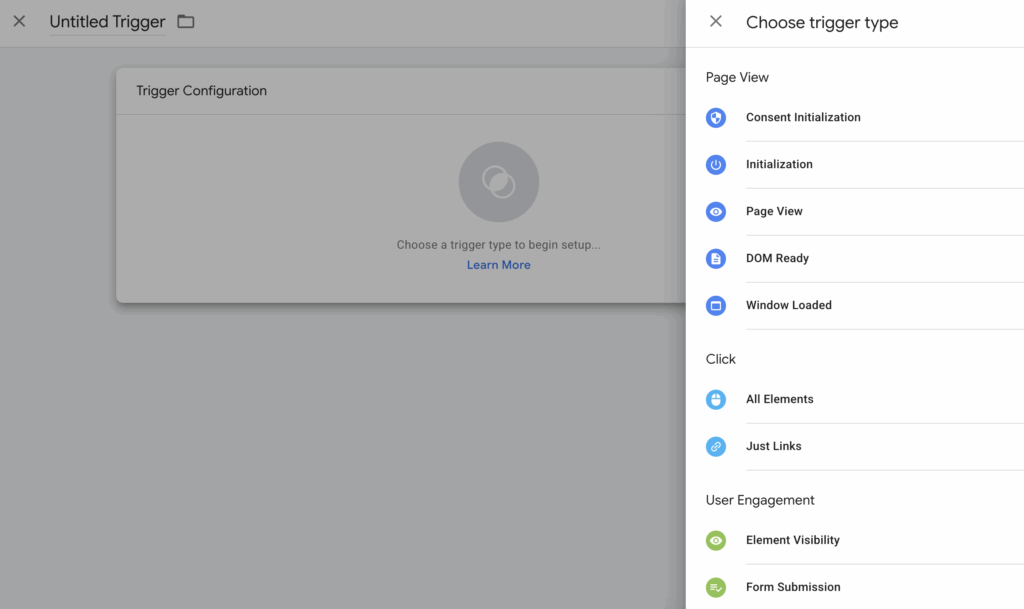
Without a trigger, your tag won’t know when to run. For targeted tracking, like a form submission or button click, you’ll need to:
- Select Triggers in GTM
- Choose a trigger type (Click, Form Submission, Page View, or Custom Event)
- Set conditions, e.g. fire only when Click Text equals Sign Up
5. Enable built-in variables
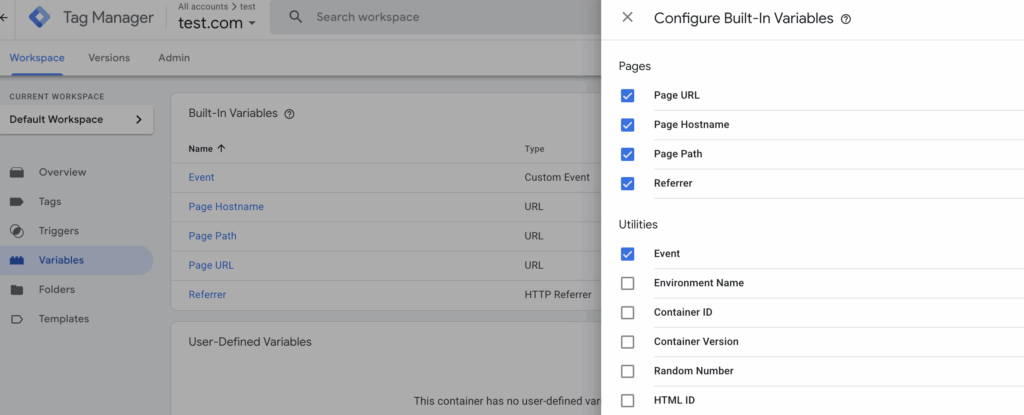
GTM comes with built-in variables that save you from having to code data points manually. To enable these built-in variables:
- Go to Variables
- Select Configure under Built-In Variables
- Check variables like Page URL, Page Path, Click URL, or Click Text
6. Test in Preview mode
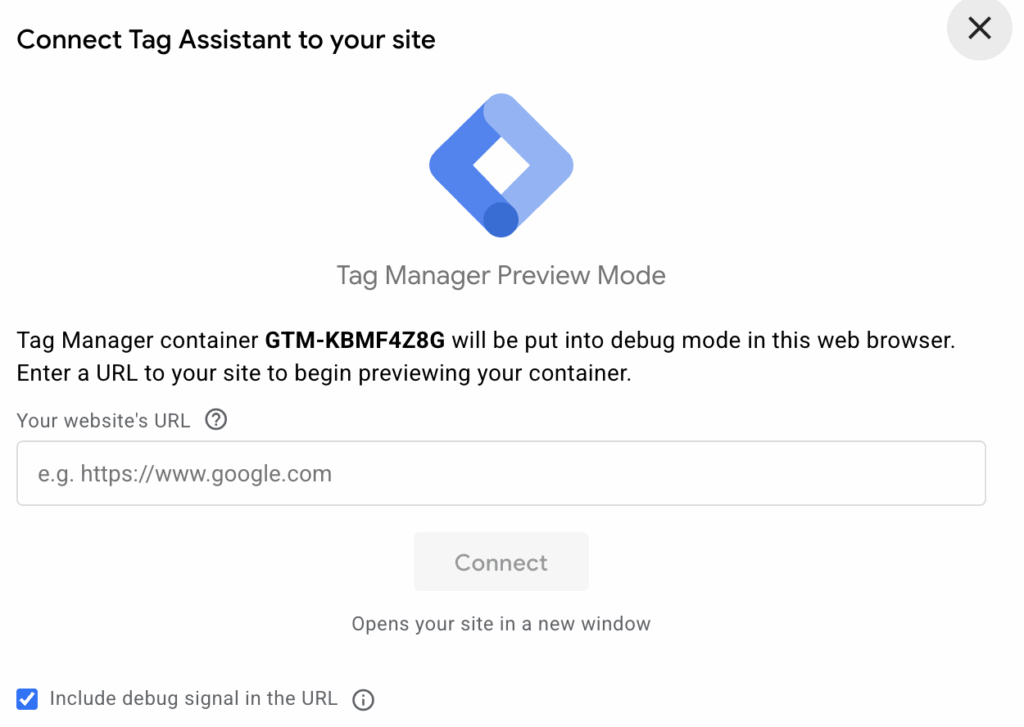
Preview mode is the best way to see whether your GTM implementation is working properly without publishing changes. To enter Preview mode, click Preview in the dashboard, enter your site URL and start the debug session, navigate to your site and see which tags successfully fire in the debug panel.
7. Publish container
Once you’re happy with how things work in Preview mode, select Submit to publish your container. You can add a Version Name and Description to help you identify changes later. Batching related changes together so your version history remains organized is recommended.
8. Verify tracking
Even after publishing, verify in GA4, or whichever platform your tag sends data to, that events and page views are being recorded correctly. This ensures your Google Tag Manager implementation is producing accurate results.
Structuring your GTM container for scalability
One of the most overlooked parts of Google Tag Manager setup is planning for growth. Many marketers rush through setting up Google Tag Manager to get tracking live as fast as possible, only to find their container becomes unmanageable after a few months.
Without a clear structure, tags fire when they shouldn’t, and triggers become hard to track.
A scalable GTM setup is more than just adding tags. It’s about maintaining order so that your GTM implementation can handle future campaigns, team changes, privacy-compliant data management, and analytics updates.
This is especially important if you’re working in a team, because GTM is often a shared workspace among marketers, developers, and analysts.
Here are some GTM best practices to keep in mind:
- Use clear naming conventions: Your GTM container may contain dozens of tags, so naming them is really important. We recommend platform (GA4, FB, etc.) > tag type or purpose (Event, Conversion, etc.) > action or description (Sign-up, Purchase, etc.)
- Organize folders: If you’re using GTM for multiple campaigns, file them separately to save time searching for specific tags.
- Reuse triggers and variables: Creating new triggers or variables can lead to duplicates and inconsistencies. The best approach is to create general purpose triggers and variables that can be applied across multiple tags.
Best practices for tag firing and trigger configuration
Even the most carefully planned Google Tag Manager setup can fall apart if tags are firing at the wrong times or under the wrong conditions.
Poor trigger logic is one of the most common problems in GTM implementation, and it’s often the reason analytics data looks suspicious or inflated. In this section, we’ll cover the best practices for tag firing and trigger configuration.
Be specific with triggers
Use click triggers for specific buttons or links, filtered by Click Text, Click URL or Element ID. Use Form Submission triggers that only fire on unique Form IDs and use Page View Triggers for specific page URLs or paths.
Use trigger exceptions
This enables you to define conditions when a tag does not fire and ensures you avoid double counting.
Sequence tags
If you want tags to fire in a specific order, you need to enable this in Advanced Settings. Enable Tag Sequencing and choose whether another tag fires before or after the main tag. This is especially useful during a Google Tag Manager custom event trigger setup.
Use Lookup Tables
Best practice is to have the same tag fire under different conditions with different values. Instead of creating several duplicate tags, you can use Lookup Table variables and implement them during the configuration.
Use Data Layer for triggering
While click and form triggers can work fine for simple tracking, the Data Layer is the most reliable method in advanced GTM implementation. Developers can push structured data to the Data Layer, and you can set custom event triggers to listen for those values, reducing the risk of tracking issues.
Managing environments: preview, debug, and publish
Unlike hardcoding tracking scripts directly into HTML, using Google Tag Manager gives you a safe, contained way to work in preview, debug, and publish stages.
Preview mode is the single most important testing tool when setting up Google Tag Manager. When you select Preview, your website opens in a special debug session, enabling you to see which tags fired and what exact variables and Data Layer values reached each tag.
While Preview mode gives you a real-time panel, Debug mode (also known as Tag Assistant Companion in Chrome) adds another layer, which enables you to replay tracking activity, isolate events in a timeline view, and identify variable values at the moment of firing.
This is especially useful when your Google Tag implementation involves multiple steps or dynamic page content. Finally, once your tags work perfectly in Preview and Debug modes, you can publish your GTM container.
GTM also supports multiple environments, including:
- Live (Production): the version seen by real users
- Staging: for testing in a pre-launch environment
- Development: for QA and experimentation
If you’re running a complex Google Tag Manager implementation across multiple domains or subdomains, environment-specific containers help you test changes in staging without affecting live users.
Proper use of GTM’s preview, debug, and publish tools is the difference between guessing your tags are working and knowing they are. In the next section, we’ll build on this by covering implementing GTM across multiple domains or subdomains, where testing across environments becomes even more important.
Implementing GTM across multiple domains or subdomains
When your business spans more than one domain or operates across multiple subdomains, Google Tag Manager setup becomes more complex. A standard single-site basic Tag Manager setup works fine for many small sites, but if you’re tracking users across pages or entirely different domains, things can get tricky.
In these scenarios, special attention to cross-domain tracking, cookie settings, and container deployment is needed to ensure you capture accurate, unified user journeys.
When setting up Google Tag Manager for multiple domains, you have two main approaches: a single GTM container, which offers centralized control over tags, triggers and variables, and separate containers, which offer cleaner separation between sites.
For a Google Tag Manager for beginners scenario, starting with a single container is the best option unless you’re working with very different business units.
If you’re working with subdomains, GA4 automatically handles them as part of the same property if the cookie domain is set correctly. In GTM, this means your GA4 configuration tag can remain the same across all subdomains. This is key for using Google Tag Manager in multisite setups without mixing irrelevant data.
GTM for server-side tagging: configuration essentials
While most people start with a basic tag manager setup that runs entirely in the browser, advanced teams are increasingly moving to server-side tagging for better performance, security, and control over data.
In a traditional GTM implementation, every tag runs in the user’s browser. In server-side mode, the browser sends event data to your GTM server endpoint, which then processes the data and sends it to relevant marketing tools.
Setting up GTM for server-side tagging involves more steps than a standard web container.
- Create a server container in your GTM account.
- Deploy the server container so it sends data to your server container instead of directly to Google or Meta.
- Reconfigure tags inside the server container to forward the data to analytics and ad platforms.
The shift to server-side Google Tag Manager implementation delivers several key advantages over traditional client-side setups.
Site performance improves because fewer scripts need to run in the visitor’s browser, leading to faster page loads and smoother user experiences. Server-side GTM gives you greater control over the data you collect and send, rather than letting every tag gather raw user information directly, which naturally supports better privacy compliance.
Another key benefit is that server-side requests are harder for ad blockers and browser privacy features to intercept, meaning you retain more accurate tracking, even as third-party cookie use declines.
While you can self-host your server-side GTM container, many marketers prefer integrated solutions that combine server hosting with built-in consent management. This approach removes the need for a development team while ensuring data quality and compliance.
Solutions like Usercentrics’ Server-Side Tagging make it possible to run a first-party GTM container on a secure server, simplifying setup while improving performance and privacy.
Common pitfalls and how to avoid them
Even the most experienced marketers and developers can run into issues during their Google Tag Manager setup. The good news is that nearly every problem can be avoided with proper planning, careful testing and structured workflows. Let’s break down the most common pitfalls and how to avoid them.
1. Publishing without testing
Skipping Preview and Debug modes opens the window for broken tracking, duplicate conversions, or missing events. Always test new tags in GTM’s Preview mode, use Debug mode to examine variable values, and click through real user flows before publishing.
2. Overloading the container with tags
A bloated GTM container can slow down your site and make management chaotic. Make sure to audit your container quarterly and remove legacy tags and triggers that no longer serve a purpose.
3. Misconfigured triggers causing over-firing
Improper trigger configuration is one of the biggest problems in Google Tag implementation. For example, if your Google Tag Manager custom event trigger setup isn’t specific enough, a conversion tag might fire multiple times.
4. Ignoring version control and documentation
Name each version descriptively, e.g. GA4 Event Tracking – Newsletter Signup, and keep a simple changelog as part of your best practices.
5. Setting up cross-domain or subdomain tracking incorrectly
When using Google Tag Manager across multiple domains or subdomains, forgetting to configure cross-domain tracking causes analytics platforms to count the same user multiple times. Plan your domain strategy during the initial account setup and confirm in testing that your GA4 client ID persists across site boundaries.
6. Relying solely on web containers instead of server-side
Consider a setup Google Tag Manager process that includes a server-side container to protect against data loss and improve performance.
7. Forgetting to update consent settings for privacy laws
In today’s compliance-focused environment, firing tags without user consent can lead to legal risks. Many teams forget to update GTM triggers to respect user choices from cookie consent banners, so ensure you build consent triggers into your GTM implementation.
8. Hardcoding tracking scripts
Mixing GTM-managed tags with hardcoded scripts makes tracking harder to manage and troubleshoot. Move all possible tags into GTM.
Avoiding these pitfalls isn’t about memorizing every Google Tag Manager basics rule; it’s about building a habit of careful planning, thorough testing and clean documentation.
Tools and extensions to enhance GTM workflows
While the Google Tag Manager setup can be done entirely within GTM’s built-in interface, using the right tools and extensions can make implementation faster and more accurate.
Here are some tools and extensions you can use:
- GTM’s built-in Preview and Debug mode: Shows which tags fired and which variables they used
- Tag Assistant Companion: Required for enabling GTM’s Preview mode on specific sites
- dataLayer Inspector+: A Chrome extension that lets you review and debug the Data Layer in real time
- GA Debugger: A Chrome extension that logs GA4 hits in the console for verification
- ObservePoint: Enterprise-level automated testing for analytics and tag deployment
- Workspace and version control: GTM’s workspaces allow different team members to work without overwriting each other’s changes, and version control lets you retain historical data
By combining these tools with disciplined testing and consistent workflows, you can turn a standard basic tag manager setup into a high-performance, error-resistant and scalable tracking environment.
Future-proof your tracking with privacy-first server-side tagging
As privacy regulations tighten and browser restrictions like Apple’s Intelligent Tracking Prevention (ITP) limit traditional tracking, the future of Google Tag Manager implementation is moving firmly toward server-side tagging.
This approach shifts data collection from the visitor’s browser to a secure server, giving you more control over what’s collected, how it’s processed, and where it’s sent.
With server-side GTM setup, your tags run in a protected environment, meaning fewer scripts are loading in the browser, faster site performance, and less interference from ad blockers.
Even better, server-side tracking lets you anonymize or filter data before passing it to third-party tools, supporting compliance with data protection laws like the GDPR and CCPA.
For marketers who want the benefits of server-side tagging without needing to hire a team of developers, Usercentrics’ Server-Side Tagging solution offers an all-in-one path forward. It combines integrated server-side GTM hosting with industry-leading consent management, helping to ensure your data collection is marketing-effective and privacy-compliant.
By hosting your Google Tag Manager container on a secure server, Usercentrics helps you:
- Improve campaign performance by sending cleaner, more accurate, and consented data to your ad tools
- Reduce costs by eliminating wasted ad spend caused by poor tracking accuracy
- Gain full control of your tracking with a first-party system
- Simplify your workflow with a solution built for marketers
If you’re serious about future-proofing your Google Tag implementation and staying compliant with privacy laws while maximizing data quality, consider server-side tagging with consent built in.