

How to install Google Tag Manager on Shopify
Installing Google Tag Manager (GTM) on Shopify gives you a faster, cleaner way to manage analytics and marketing tags across your store. Instead of adding snippets manually, you can control everything from one dashboard, helping you to reduce errors and maintain consistent, compliant data collection across every touchpoint.
In this guide, we’ll walk through each step of adding Google Tag Manager to Shopify, explain how it supports accurate, privacy-first tracking, and share tag implementation tips to help you avoid common setup mistakes.
Key takeaways
- Google Tag Manager (GTM) on Shopify centralizes tag management, improving data collection, performance, and compliance.
- Prepare your Shopify store by confirming access, creating a GTM account, understanding plan limitations (Shopify Plus for checkout tracking), and reviewing your data and consent strategy.
- Install GTM manually by adding code snippets to theme.liquid or use a Shopify app for easier integration.
- Verify your GTM installation using Preview Mode and Google Tag Assistant to avoid common errors like incorrect code placement or duplicate scripts.
- Client-side GTM faces limitations due to ad blockers, cookie restrictions, and privacy regulations, leading to data inconsistencies.
- Server-side tagging (SST) enhances data accuracy, page performance, privacy compliance, and ad tracking by processing data in a secure, controlled environment.
- Usercentrics Server-Side Tagging integrates with GTM and Shopify to create a privacy-first data pipeline, ensuring consent enforcement and resilient data distribution.
How Google Tag Manager improves tracking and performance on Shopify
Google Tag Manager (GTM) is a free tool from Google that enables you to manage and deploy marketing and analytics tags across your Shopify store without manually editing the site’s source code every time.
Instead of relying on developers to make every small change, marketers and data teams can act faster while keeping their sites clean and consistent.
Whenever you want to add a custom pixel, update your Google Analytics tracking, or connect a new marketing platform, you can do it from your GTM dashboard. That centralized location will assist your marketing measurement efforts and help you maintain accurate data that fuels better business decisions.
How Google Tag Manager simplifies Shopify tracking
Shopify’s built-in tracking options are limited. GTM bridges that gap by offering a centralized, flexible system for tag management. From there, you’ll be able to:
Replace dozens of standalone tags with one GTM container.

Add, edit, or remove tags instantly without publishing new theme versions.

Avoid duplicated scripts and code conflicts that often break analytics.

GTM loads tags asynchronously, preventing slow or blocked scripts from delaying your store.

Set up granular event tracking, e-commerce conversions, and remarketing pixels with precision.
Marketers gain better insight into customer behavior, and for developers, implementing GTM means fewer manual updates and cluttered code.
Why GTM matters for privacy-first measurement
With browser restrictions, ad blockers, and privacy regulations like the General Data Protection Regulation (GDPR) and the California Consumer Privacy Act (CCPA), traditional tagging methods often fail to capture reliable data.
Google Tag Manager supports consent-aware tagging and integrates easily with privacy and consent management tools, making it the foundation for privacy-ready marketing analytics. By using GTM on Shopify, you’re building a future-ready measurement system that supports both compliance and performance.
Preparing your Shopify store for GTM installation
Before installing Google Tag Manager on Shopify, there are a few things you need to do for a smooth setup and accurate tracking. Take the time to prepare to prevent broken tags, data inconsistencies, and compliance gaps later on.
1. Confirm your access and permissions
You’ll need full Shopify admin access to edit your theme files or install apps. If you’re part of a larger team, confirm that you have permission to modify the store’s tracking or analytics settings.
Access control is especially important when multiple users or agencies manage the same store, as changes to theme code can affect live tracking.
2. Create or verify your Google Tag Manager account
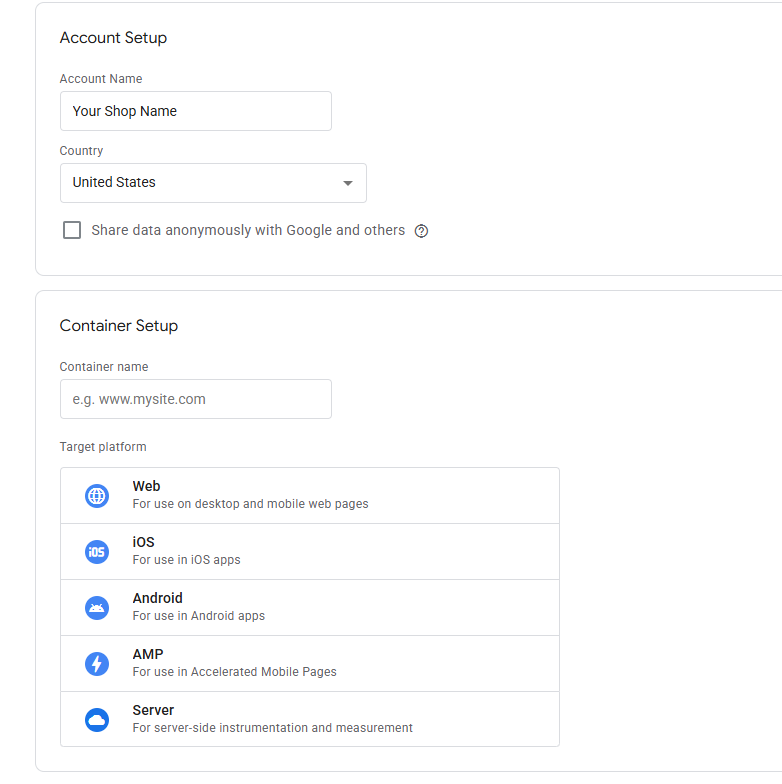
Go to tagmanager.google.com and sign in with the Google account linked to your business.
- Create a new account using your business name and select Web as the target platform.
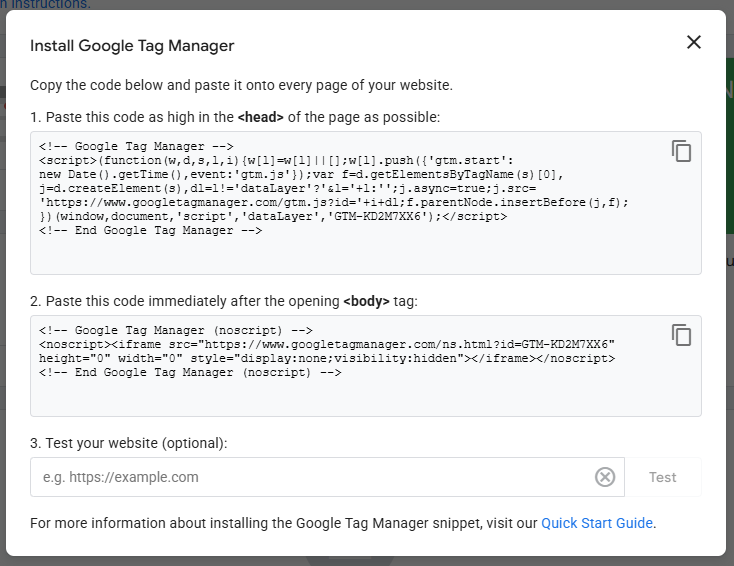
- Google Tag Manager will generate two code snippets: one for the <head> section and one for the <body> of your Shopify theme. You’ll add these snippets later during installation.
3. Check your Shopify plan and theme setup
All Shopify plans support Google Tag Manager, but checkout tracking behaves differently depending on your plan:
- Shopify Plus users can add GTM directly to the checkout pages.
- Standard plans can track up to the payment step but not the checkout confirmation page, due to platform restrictions.
Before you continue, back up your theme to avoid losing customizations. Navigate to Online Store → Themes → Actions → Duplicate, and work in the duplicated version. This enables you to roll back changes if something doesn’t work as expected.
4. Decide how you’ll add GTM to Shopify
There are two main ways to install GTM:

by editing your theme.liquid file

via a Shopify app that automatically injects GTM code
Manual setup gives you greater control and visibility. App-based installation can simplify the process if you’re less comfortable editing code. Either method will work, so the right choice for you depends on your technical confidence and your store’s complexity.
5. Review your data and consent strategy
Before enabling tracking, outline what data you’ll collect and how you’ll communicate consent to visitors. While you’re implementing GTM, it’s a great time to review privacy workflows and align your tracking with the GDPR, the CCPA, and other relevant regulations or frameworks.
Learn how to build privacy-compliant, future-ready measurement strategies with our guide to the future of data in marketing.
Step-by-step guide: How to install Google Tag Manager on Shopify
Once your store is prepped and ready, it’s time to install Google Tag Manager on Shopify. You’ll need to create a GTM container, add the container snippet to your Shopify theme, and confirm that everything is working correctly.
Step 1: Add GTM code snippets to your Shopify theme
After creating your Google Tag Manager container in the previous step, it’s time to add the code snippets you saved to your Shopify theme. For most stores, the easiest way to do this is through the theme.liquid file.
1. In your Shopify admin panel, go to Apps and sales channels → Online Store → Themes → … → Edit Code.
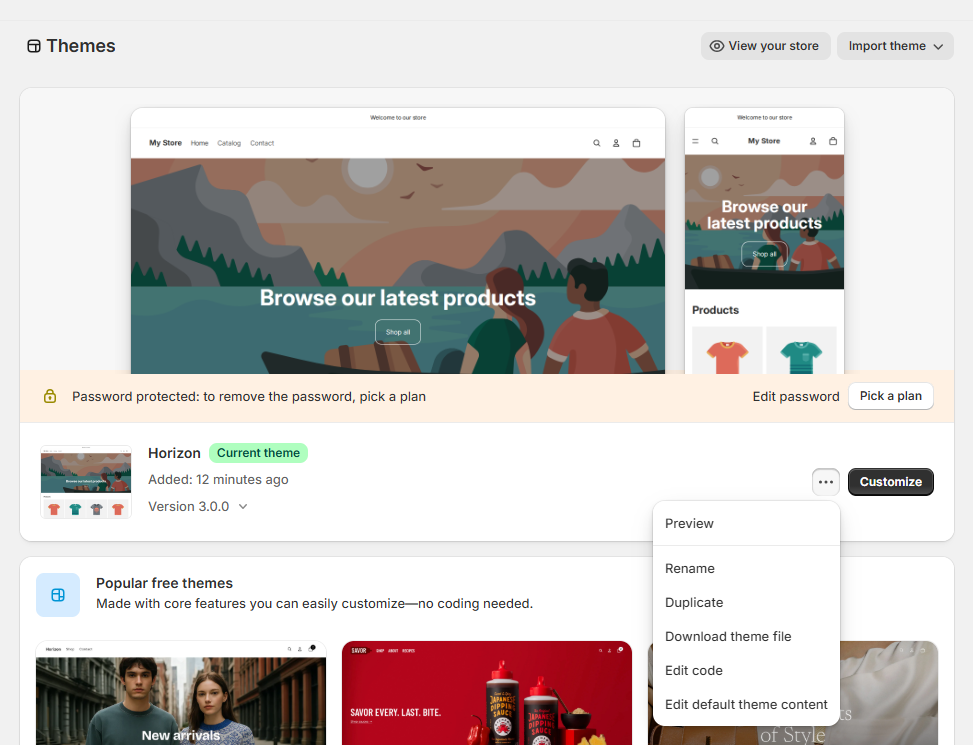
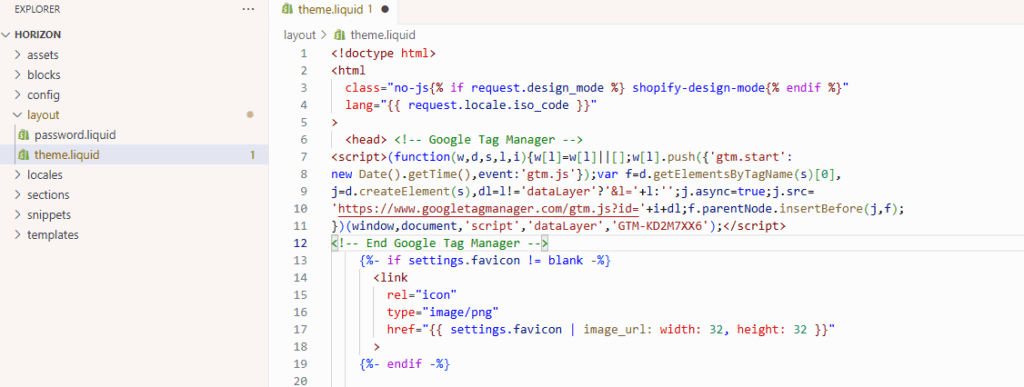
2. Under the Layout folder, open the theme.liquid file.
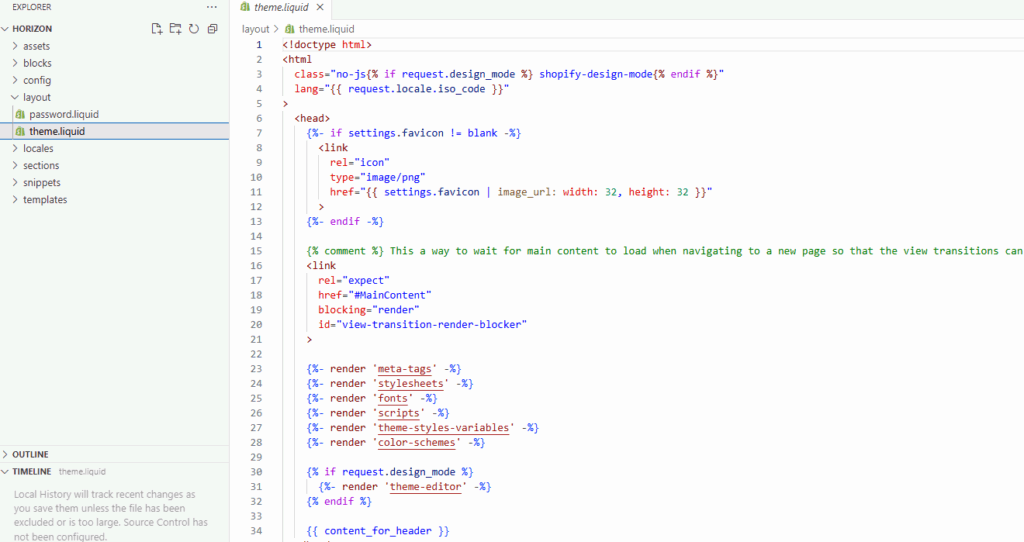
3. Paste the first GTM code snippet right after the opening <head> tag.
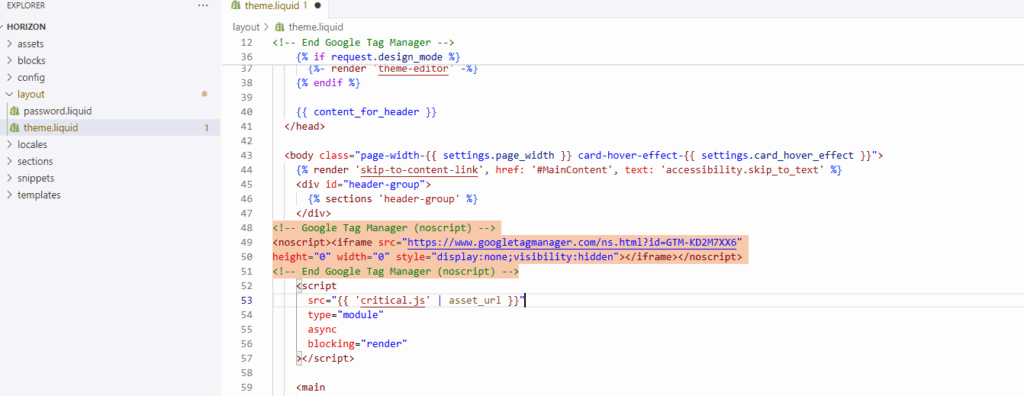
4. Paste the second snippet immediately after the opening <body> tag.
5. Click Save to publish your changes.
Tip: Always edit a duplicate theme rather than the live version. Doing so will help you avoid downtime or broken scripts if something goes wrong.
If you’re using an Online Store 2.0 theme, placement still follows the same structure with head snippet at the top, body snippet below.
Step 2: Add GTM to checkout pages (Shopify Plus only)
If you’re on Shopify Plus, you can include tracking across checkout and order confirmation pages for more complete conversion data.
- From your Shopify admin page, go to Settings → Checkout → Checkout scripts.
- Paste the body GTM snippet in the appropriate script box.
- Save your changes.
As mentioned above, checkout customization is limited on Standard plans. GTM can still track pre-checkout events such as cart updates and form submissions, but order confirmation events require alternative solutions like server-side tagging.
Step 3 (optional): Use a Shopify app for GTM integration
If you prefer not to edit your theme code, several apps in the Shopify App Store can automatically inject GTM code snippets for you. Search for “Google Tag Manager” or “GTM” and choose a trusted, well-reviewed option.
App-based setup is faster and reduces manual edits, but keep in mind:
- You’ll rely on the app’s update cycle for GTM compatibility.
- You may have limited access to the container placement for advanced use cases.
- You need to check the app’s data handling practices to stay aligned with your privacy policy.
For full control over tracking and compliance, manual installation will always be the best method.
Step 4: Verify your GTM installation
Before deploying any tags, take a moment to verify that Google Tag Manager is correctly installed on your Shopify store.
- In GTM, click Preview and enter your store URL to open Preview Mode.
- Check that your site loads correctly and the GTM debug panel appears.
- Navigate through key pages (homepage, product pages, cart, checkout) to verify that your GTM container fires on each.
- Use Google Tag Assistant to confirm that the GTM container ID matches your setup and no errors are present.
Once verified, you can publish your GTM container and start creating tags for Google Analytics 4 (GA4), Google Ads, Meta Pixel, and other tools.
For best results, pair this setup with a consent management platform (CMP) like Usercentrics CMP that collects consent information and signals it to your tools like GTM to help ensure tags respect user consent choices.
For guidance on improving campaign efficiency, explore our guide to Google Ads optimization.
Common issues when installing GTM on Shopify
Even a small error in your Shopify Google Tag Manager setup can lead to missing data, inaccurate reporting, or broken site functionality. Here’s how to diagnose and fix the most common problems.
1. Avoid incorrect code placement
Placing GTM snippets in the wrong location is the most frequent cause of tracking errors.
- The <head> snippet must sit directly below the opening <head> tag.
- The <body> snippet should appear immediately after the opening <body> tag.
If either snippet is missing or placed incorrectly, Google Tag Manager won’t initialize correctly, and tags may fail to fire.
Tip: Always check placement using GTM Preview Mode and Google Tag Assistant before publishing.
2. Remove duplicate or conflicting tracking scripts
Many Shopify themes and marketing apps automatically include Google Analytics or advertising pixels. When GTM adds another version of the same script, double-tagging (and duplicate tracking) will occur.
This can create long-term data integrity issues, especially when comparing performance metrics across systems, because it inflates key data like sessions, transactions, or conversions.
To prevent double-tagging:
- Audit your theme.liquid and any app integrations for existing analytics tags.
- Remove or disable duplicates before enabling GTM.
- Verify your event tracking by comparing counts in Google Analytics 4 or your ad platforms.
3. Address checkout tracking limitations
If you’re on a standard plan and need complete conversion tracking, explore server-side implementations. They give you enhanced measurement without upgrading your plan, so you can capture checkout page data accurately without relying on browser-based scripts.
4. Check for third-party app conflicts
Shopify apps that insert scripts, e.g., for chat widgets, review tools, or analytics extensions, can interfere with GTM’s operation by injecting duplicate code or overriding your tag container. If tracking breaks after installing a new app, test your site in GTM Preview Mode to identify which script caused the conflict.
When possible, use GTM to manage all marketing scripts centrally rather than allowing each app to insert its own tracking code. This will help you maintain cleaner data and improve site performance.
5. Respect consent and privacy settings
Even technically correct implementations can fall short of privacy compliance requirements. Every GTM container should respect user consent preferences before loading non-essential tags and tracking codes. Failing to do so can result in violations of privacy laws.
Integrate your consent management solution directly with GTM so tags will only fire after consent has been given. This not only protects user trust but also improves data quality by keeping your analytics legally sound.
Why client-side GTM may not be enough
Installing Google Tag Manager on Shopify offers flexibility and control, but browser-based tracking is becoming more limited as privacy rules and technology evolve. Modern browsers, ad blockers, and data privacy and protection regulation all restrict how scripts can collect and store user data, which creates blind spots that weaken analytics accuracy and privacy compliance.
Ad blockers and shortened cookie lifespans
Ad blockers and privacy extensions can stop GTM scripts from loading altogether, while Safari’s Intelligent Tracking Prevention (ITP) and similar features shorten cookie life or delete them sooner, sometimes within hours. Disrupted continuity between sessions leads to incomplete journeys and unreliable attribution.
Data inconsistencies across devices and regions
Client-side data collection varies across browsers, devices, and user settings. A visitor might appear as two different users across platforms, fragmenting your analytics. Add GDPR or CCPA restrictions and cross-region comparisons can become even more complex.
Consent and compliance gaps
Even technically correct setups can fail compliance checks if tags fire before consent is given. Every client-side implementation should be integrated with a CMP so that only approved tags activate, protecting both users and your business.
The benefits of server-side tagging for Shopify
Server-side tagging (SST) solves these challenges by shifting data processing from the browser to a secure, controlled environment. No matter which of the many server-side tagging tools you choose, it will help your Shopify store maintain accurate analytics, faster performance, and stronger privacy compliance from a setup they can fully control.
1. Greater data accuracy
In a server-side setup, event data is sent from your own server rather than the user’s browser. This removes the impact of ad blockers, cookie restrictions, and inconsistent browser policies, producing cleaner and more complete datasets for decision-making.
2. Faster page performance
With fewer scripts running in the browser, pages load faster and performance scores improve. Data is collected once, processed on the server, and then sent to your analytics and marketing platforms. This creates a smoother experience for shoppers and better Core Web Vitals results.
3. Stronger privacy and compliance controls
Server-side tagging impacts consent management by giving you full oversight of what data is collected, processed, and shared. You can remove or anonymize personal identifiers before forwarding data, which supports alignment with global privacy standards. Combined with a CMP, SST helps ensure tags only fire when consent is granted.
4. More resilient ad tracking
Other benefits of server-side tracking include future-proofing your ad tracking. By handling conversions from your own domain and sending only approved data to advertising platforms, SST maintains accurate campaign attribution even as third-party cookies fade out and marketers prepare for a cookieless future.
This approach improves Google Ads tracking and enhanced measurement in GA4 by recording conversions consistently, even if cookies are restricted or blocked.
5. Simplified governance and transparency
All data transfers flow through a controlled environment, giving you visibility into what’s collected, where it’s processed, and how it’s shared. This makes privacy compliance audits easier and simplifies internal reviews while reducing operational risk.
How Usercentrics Server-Side Tagging integrates with Google Tag Manager and Shopify
When you integrate Usercentrics Server-Side Tagging (SST) with Google Tag Manager and Shopify, you create a complete, privacy-first data ecosystem. Each layer plays a distinct role: from collecting user interactions in Shopify to securely processing data in your SST container and distributing it to analytics and advertising platforms.
A streamlined, compliant data flow
Usercentrics Server-Side Tagging (SST) works alongside Google Tag Manager and Shopify to create a clear, privacy-first data pipeline. Each layer plays a distinct role in collecting, processing, and distributing customer event data responsibly:
- Data collection in Shopify: Every interaction — from product views and add-to-carts to completed purchases — generates customer event data. GTM captures this activity directly from your Shopify store.
- Routing through the SST container: Events are then sent to a secure, server-side tagging container where Usercentrics applies consent logic, removes personal identifiers, and formats the data for downstream use.
- Distribution to analytics and marketing tools: The processed data is shared with Google Analytics 4, Google Ads, Meta, and other platforms. Because it originates from your own domain, it’s resilient to browser tracking limits and supports first-party data strategies.
This setup centralizes control of your data flow, helping to ensure every transfer is privacy-compliant, consistent, and auditable. It’s a foundation you can build on as your analytics stack evolves.
Key benefits of integrating Usercentrics SST with GTM and Shopify
By combining Usercentrics SST, Google Tag Manager, and Shopify, you create a measurement framework that’s not only accurate and enables privacy compliance, but is also built for long-term adaptability. The result is a single ecosystem where privacy, performance, and data quality reinforce each other:

Consent preferences collected through your CMP are automatically signaled before data is processed or shared, so every tag use aligns with user choices.

You gain full oversight of what’s collected, where it’s stored, and how it’s distributed, simplifying audits and strengthening accountability.

With fewer scripts running in browsers, analytics stay stable and page speed improves, even as privacy controls tighten across the web.

The setup is designed to evolve with changing standards like Google Topics, the Protected Audience API, and other privacy-preserving technologies.
When paired with customer data platforms (CDPs), this integration becomes even more powerful, as it connects compliant event data with unified customer profiles for deeper insight and smarter activation across channels.